Lab 5.2: Functions, callbacks and event listeners
Part of Week 5: Introducing JavascriptGeneral setup
For all lab exercises you should create a folder for the lab somewhere sensible.
Assuming you have a GAMR1520-labs folder, you should create a GAMR1520-labs/week_5 folder for this week and a GAMR1520-labs/week_5/lab_5.2 folder inside that.
JavaScript setup
Though it is possible to contain everything within one file, a JavaScript project will usually contain a collection of multiple files.
GAMR1520-labs
└─ week_5
    └─ lab_5.2
        ├─ experiment1
        │    ├─ index.html
        │    └─ scripts.js
        └─ experiment2
             ├─ index.html
             └─ scripts.js
For simple projects, there will always be an index.html and the javascript file can always be something like scripts.js, though you can choose your own names. Using the same template for multiple examples is convenient. Try to name your folders better than this, the folder name should reflect their content. For example, blank_template, edit_elements or simple_drawing.
Resources
If you want to find out more information about any aspect of web development, the best resource is the Mozilla Developer Network web documents, in particular the JavaScript documentation will be invaluable for this module.
General approach
As you encounter new concepts, try to create examples for yourself that prove you understand what is going on. Try to break stuff, its a good way to learn. But always save a working version.
Modifying the example code is a good start, but try to write your own programmes from scratch, based on the example code. They might start very simple, but over the weeks you can develop them into more complex programmes.
Think of a programme you would like to write (don't be too ambitious). Break the problem down into small pieces and spend some time each session trying to solve a small problem.
We have seen that a <script> element included in a document can include code.
When the document loads, the script will execute immediately.
This can be great and just what we want, but it can also cause problems.
For example, take this simple document.
There is a <script> element containing some JavaScript code in the middle of the document.
<!DOCTYPE html>
<html lang="en">
<head>
<meta charset="UTF-8">
<meta http-equiv="X-UA-Compatible" content="IE=edge">
<meta name="viewport" content="width=device-width, initial-scale=1.0">
<title>A broken example</title>
</head>
<body>
<h1>Broken example</h1>
<p>The script accesses the <body> element.</p>
<p>It loops over body.children.</p>
<p>logging each element in turn.</p>
<script>
for (const element of document.body.children) {
console.log(element);
}
</script>
<p>But everything after the script is ignored.</p>
<p>It hasn't been loaded into the DOM yet.</p>
<p>The script executes first.</p>
</body>
</html>
We usually don’t put code inline in the HTML document like this. It’s much better to use the
srcattribute of the<script>element and create separate files with JavaScript code.
Execute the code in a browser and you will see that there are only five console log messages. This is because when the file is parsed by the browser, it is very careful to load each element into the DOM in the correct order.
The browser executes the code as soon as the script element is loaded into the DOM. At which point, the code queries the DOM for elements and logs them in turn. Finally, after the script has finished executing, the last three elements are added to the DOM.
So our script actually pauses the parsing of the HTML file and slightly delays the elements from appearing on the page.
If only there were a way to wait for the DOM content to be fully loaded before executing the code… We will return to this later.
Functions
In JavaScript, a function can be defined using the function keyword, like this:
function createElementWithContent(tagName, textContent) {
    const element = document.createElement(tagName);
    element.textContent = textContent;
    return element;
}
The function keyword is used a lot like def in python.
We can call our function like this.
const parent = document.createElement('article');
const title = createElementWithContent('h1', 'Functions');
const description = createElementWithContent('p', 'Ok, this is quite easy.');
parent.append(title, description);
document.body.append(parent);
Study the above code carefully. Try it yourself. Make sure you understand before moving on.
Alternatively, we can do this to create the same function.
const createElementWithContent = function(tagName, textContent) {
    const element = document.createElement(tagName);
    element.textContent = textContent;
    return element;
}
Above we declare a constant variable createElementWithContent and assign it to the function object.
This underscores the fact that functions in JavaScript (as in python) are just another kind of object.
Try passing a function into console.log.
Callbacks
Since functions can be used as data, it is a very common pattern to pass functions as arguments into other functions. This is known as a callback. Many built-in JavaScript features are implemented using callbacks.
For example, the Array.map() method transforms an array into a new array by passing each element of the original array through a user-provided function and collecting the results into a new array.
Its a bit like a list comprehension in python.
Let’s define a function that converts a string into a paragraph element.
function textToParagraph(text) {
    const p = document.createElement('p');
    p.textContent = text;
    return p;
}
Our function takes one argument.
Now we can pass this function as a callback into Array.map().
const arr = ['a', 'b', 'c'];
const paragraphs = arr.map(textToParagraph);
console.log(paragraphs);
Try it for yourself. This is nice functional programming style.
In this and many other methods of the Array prototype, the callback can take up to three arguments. Usually the first argument is the element value (
'a','b'and'c'in this case), the second argument is the index of the element within the array (0,1and2in this case) and the final argument is the entire original array. This allows for some pretty fancy array processing. Check the documentation for details.
Arrow functions
A newer way to define functions which was introduced in ECMAScript 2015 is arrow functions. These are more concise and are commonly inserted inline when a callback function is needed
The format for an arrow function basically removes the function keyword and adds an arrow (=>) between the function arguments and the function body.
const textToParagraph = (text) => {
    const p = document.createElement('p');
    p.textContent = text;
    return p;
}
A more concise format is possible for simple functions. Parentheses can be left out around single arguments. Curly braces can be left out around a single line function body. Return statements can also be left out for a single line function body.
const doubleIt = arg => arg * 2;
Is is common to use arrow functions inline as callbacks when the function is only being used once, like this.
const arr = ['a', 'b', 'c'];
arr.forEach(item => {
    console.log(textToParagraph(item));
});
The above code iterates over the array
arrand passes each item into thetextToParagraphfunction before passing the result intoconsole.log. Notice how the brackets round theforEachmethod are wrapped around the entire arrow function. This is because we are passing a function literal as an argument toArray.forEach.
The Array.forEach method is a similar method to Array.map.
Rather than gathering the results of function calls into a new Array, it simply calls the provided function once per item.
Another form for the above logic would be to convert using Array.map and then pass console.log as a callback to Array.forEach.
Like this.
const arr = ['a', 'b', 'c'];
const paragraphs = arr.map(textToParagraph);
paragraphs.forEach(console.log);
This code loops over the array twice, but the intention is hopefully clear.
As with python, we can often reduce code to a single expression by chaining expressions together. Here’s an alternative version of the same logic.
['a', 'b', 'c'].map(textToParagraph).forEach(console.log);
At some point, this can become less readable, but in this case it’s fairly easy to understand what is going on. Because of the increased efficiency (less variables, more garbage collection) this is often preferable and can be formatted on multiple lines for readability.
['a', 'b', 'c']
    .map(textToParagraph)
    .forEach(console.log);
It’s important that you understand the above code and what it is doing.
If you don’t understand or want to clarify, ask someone nearby, they might know.
Write a function
Experiment with JavaScript functions.
- In a new folder, create an HTML page with a single
<ol>element inside the<body>.- Give the
<ol>element anidattribute with a name you can use as a JavaScript variable- Write a function that takes a single argument and returns an
<li>element with contents provided by the argument.- Create an array of strings and call the
Array.mapfunction on the array, passing your new function as a callback.- With the resultant array, call
Array.forEachand insert each element into your<ol>.If you need help with this, make sure you ask.
Arguments
Functions in JavaScript define arguments much the same as in python. However, the number of arguments is not enforced.
Here we define a function that takes two arguments (a and b).
function f(a, b) {
    console.log(a, b);
}
f();
f(1);
f(1, 2);
f(1, 2, 3);
undefined undefined
1 undefined
1 2
1 2
We can call the function with fewer or more arguments than are specified.
Extra arguments are ignored, missing arguments are set to undefined.
The default value for an argument is usually undefined.
However, we can set the default value for an argument a bit like keyword arguments in python.
function f(a, b = "default value") {
    console.log(a, b);
}
f();
f(1);
f(1, 2);
f(1, 2, 3);
undefined "default value"
1 "default value"
1 2
1 2
Default values
Default values can be applied to any or all arguments.
function f(a = "default value", b) {
    console.log(a, b);
}
f();
f(1);
f(1, 2);
f(1, 2, 3);
"default value" undefined
1 undefined
1 2
1 2
Be aware that if you pass in the value
undefinedas a parameter, then the argument will still be given the default value inside the function as this is considered equivalent to not passing a parameter.function f(a = "default value", b) { console.log(a, b); } f(); f(undefined); f(undefined, undefined);"default value" undefined "default value" undefined "default value" undefined
Rest parameters
It’s also possible to capture an unspecified number of arguments by prefixing the last argument with three dots.
This will cause all additional arguments to be combined into a single Array.
function f(a = "default value", b, ...theRest) {
    console.log(a, b, theRest);
}
f();
f(1);
f(1, 2);
f(1, 2, 3);
f(1, 2, 3, 4);
"default value" undefined []
1 undefined []
1 2 []
1 2 [3]
1 2 [3, 4]
Event listeners
JavaScript has an event loop built in. This means we can register listeners to wait for certain events in the browser and execute code when the event fires. Common events include user interaction (via mouse, keyboard, touch etc.) and lifecycle events such as an event that triggers when the DOM content is fully loaded.
An event handler is just a function. It optionally takes an event as an argument, but it can ignore this. Let’s start with a simple example.
Here’s a function that has a visible side effect (in the console).
Write this into a file called scripts.js.
function myEventHandler() {
    console.log("I'm Handling it!")
}
We have added a button (with id="trigger")into the body of a simple HTML template.
<!DOCTYPE html>
<html lang="en">
<head>
    <meta charset="UTF-8">
    <meta http-equiv="X-UA-Compatible" content="IE=edge">
    <meta name="viewport" content="width=device-width, initial-scale=1.0">
    <title>Event handling</title>
</head>
<body>
    <button id="trigger">click me</button>
    <script src="scripts.js"></script>
</body>
</html>
So we can register an event listener that will execute the handler on the button 'click' event.
Add this after your event handler.
trigger.addEventListener('click', MyEventHandler);
Now in our code, a
triggervariable has been declared automatically for our element. This will happen for any element with anidattribute set to a valid JavaScript variable name.
It’s as simple as that. Now, clicking the button will execute our function.
A more useful example could replace the JavaScript with this.
Replace your code in scripts.js with this
let clicks = 0;

function myEventHandler() {
    clicks += 1;
    trigger.textContent = `clicked ${clicks} times`;
}

trigger.addEventListener('click', myEventHandler);
Here’s a button running the above code:
The above code, rewritten as an arrow function, looks like this.
let clicks = 0;
trigger.addEventListener('click', () => {
    clicks += 1;
    trigger.textContent = `clicked ${clicks} times`;
});
This is the same, you can use it in scripts.js if you like.
Event listeners can be added to any element in the page.
Experiment with different code.
Maybe try the 'dblclick' event which fires on a double click.
Or the 'keydown' and 'keyup' events which fire when keys are pressed and released.
Or the 'mousemove' event which fires when the mouse moves over an element.
We can develop examples using each of these events.
Keyboard events and the event object
When events are triggered, data about the event is collected into an object which is passed to any registered event handlers as an argument. In the above examples we ignored this object. For some event processing, we need to inspect the object to get information about the event.
Detecting keyboard events is a good example. For example, we might want to know which key was pressed. This can be very useful for game-like systems. For now, we will create a contrived example as a demonstration.
Here’s another HTML document.
Create this as index.html, in a new folder.
<!DOCTYPE html>
<html lang="en">
<head>
    <meta charset="UTF-8">
    <meta http-equiv="X-UA-Compatible" content="IE=edge">
    <meta name="viewport" content="width=device-width, initial-scale=1.0">
    <title>Keyboard events</title>
</head>
<body>
    <ul id="target"></ul>
    <script src="scripts.js"></script>
</body>
</html>
We have created an unordered list (<ul>) where we will place our output.
Adding an
id="target"attribute to the body is convenient because it will automatically define a constant for us in JavaScript which will allow us to reference the<ul>element.
We will start by creating a new event handler and just logging the event object.
function myKeyDownHandler(ev) {
    console.log(ev);
}
window.addEventListener('keydown', myKeyDownHandler);
Notice the event handler has one argument we have called
ev. This is the event object.
Our event handler will be triggered by the keydown event on the window object.
Try pressing a key and see what happens in the console.
You should see something like this. If you don’t, then try to make sure the webpage is active, not the console. If your cursor is active in the console then the
windowwill not receive thekeydownevent. In order for the event handler to be triggered, the web page itself must be active.
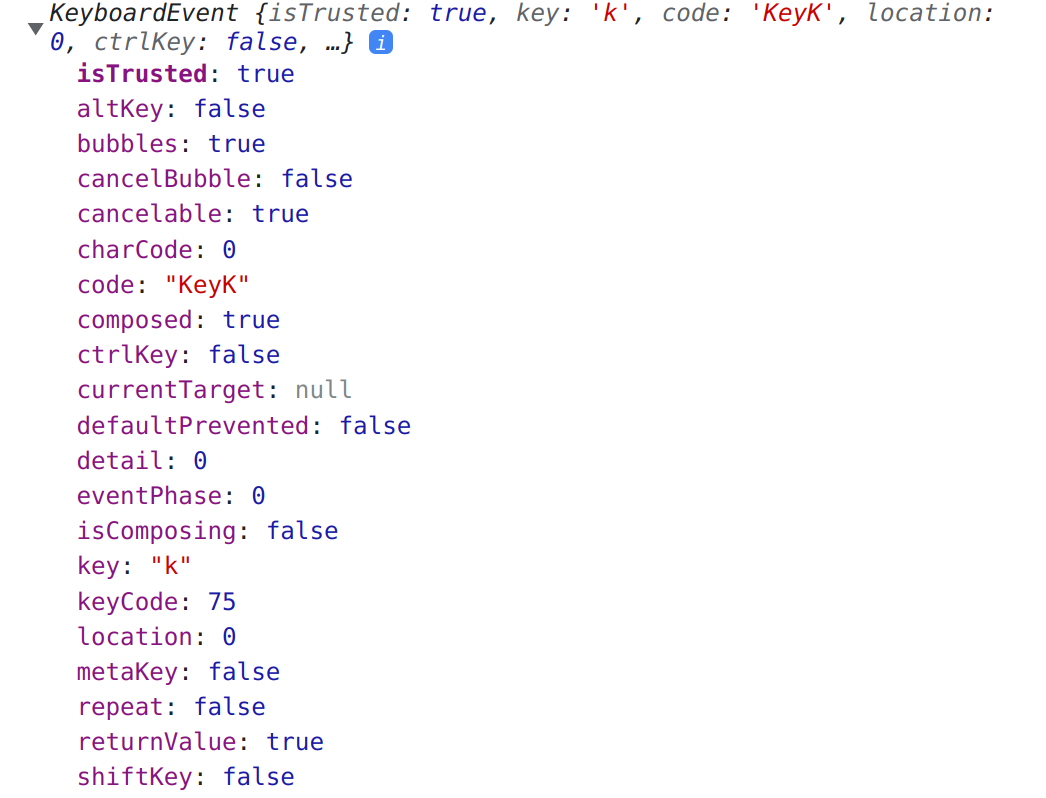
Notice the key property contains the key that was pressed.
In this case it was 'k'.
Now, we will upgrade our handler to only print the key property.
function myKeyDownHandler(ev) {
    console.log(ev.key);
}
window.addEventListener('keydown', myKeyDownHandler);
Again, check the console and you should see that every time the event is triggered (by pressing keys) our code is logging the appropriate letter.
We can also put the data into the page rather than logging it.
function myKeyDownHandler(ev) {
    target.textContent = `You pressed the '${ev.key}' key`;
}
window.addEventListener('keydown', myKeyDownHandler);
Here we are referring to the
targetelement, which was given the attributeid="target".
Try pressing various keys and see the result here:
Press the Enter key and notice that ev.key has the value "Enter".
Study the following code and see if you can work out what it is doing.
let output = "";
const entry = document.createElement('li');
target.append(entry);
function myKeyDownHandler(ev) {
    if(ev.key == "Enter") {
        const li = document.createElement('li');
        li.textContent = output;
        entry.after(li);
        output = "";
    } else {
        output += (ev.key);
    }
    entry.textContent = output;
}
window.addEventListener('keydown', myKeyDownHandler);
Lookup the Element.after method we used here. It does a similar thing to Element.append but gives more control over exactly where to insert an element into the DOM.
You should have something like this in your page:
If you want to style your element like this, update your HTML.
<ul id="target" style="background: #333; color: #eee;"></ul>