Lab 6.2: Using classes and modules
Part of Week 6: Game-like systemsGeneral setup
For all lab exercises you should create a folder for the lab somewhere sensible.
Assuming you have a GAMR1520-labs folder, you should create a GAMR1520-labs/week_6 folder for this week and a GAMR1520-labs/week_6/lab_6.2 folder inside that.
JavaScript setup
Though it is possible to contain everything within one file, a JavaScript project will usually contain a collection of multiple files.
GAMR1520-labs
└─ week_6
    └─ lab_6.2
        ├─ experiment1
        │    ├─ index.html
        │    └─ scripts.js
        └─ experiment2
             ├─ index.html
             └─ scripts.js
For simple projects, there will always be an index.html and the javascript file can always be something like scripts.js, though you can choose your own names. Using the same template for multiple examples is convenient. Try to name your folders better than this, the folder name should reflect their content. For example, blank_template, edit_elements or simple_drawing.
Resources
If you want to find out more information about any aspect of web development, the best resource is the Mozilla Developer Network web documents, in particular the JavaScript documentation will be invaluable for this module.
General approach
As you encounter new concepts, try to create examples for yourself that prove you understand what is going on. Try to break stuff, its a good way to learn. But always save a working version.
Modifying the example code is a good start, but try to write your own programmes from scratch, based on the example code. They might start very simple, but over the weeks you can develop them into more complex programmes.
Think of a programme you would like to write (don't be too ambitious). Break the problem down into small pieces and spend some time each session trying to solve a small problem.
In the last exercise we developed a pattern which allowed us to create fairly complex scene data. We created a list of objects with various properties that related to how they were rendered on the canvas (e.g. location, size, angle) and how they behaved (e.g. movement, rotation frequency).
Following on from the last exercise, in this exercise, we will introduce an object-oriented approach which will add methods to our objects so they can provide complex capabilities such as updating and drawing themselves.
This approach has two main advantages. Firstly, it allows us to clear out clutter from our central logic and thus makes it easier to add further layers of complexity. Secondly, it allows us to create different types of objects in which we keep all the related data and logic together in one place.
Since our objects know how to behave and how they look, we can focus on how they interact.
Copy the template from the previous exercise and name it Example 4: Using classes or similar.
Using ES6 modules
Since 2015, JavaScript has supported modules. Now browser support is good, we should always consider using modules for moderately complex projects.
Update the <script> element in your index.html as follows.
<!DOCTYPE html>
<html lang="en">
<head>
    <meta charset="UTF-8">
    <title>Example 4: Using classes</title>
    <link rel="stylesheet" href="style.css">
    <script src="scripts.js" type="module" defer></script>
</head>
<body>
    <h1>Example 4: Using classes</h1>
    <canvas id="canvas" width="600" height="600"></canvas>
</body>
</html>
Notice we have added a type="module" attribute to our script element.
This means we can use multiple files and the import and export keywords.
We have also moved the script into the <head> element and added the defer attribute to indicate that the module should not be executed until the DOM is loaded.
Make sure you are using the live server extension. Without this, modules won’t work.
Define a class
We are going to need to build some infrastructure before anything will work.
Let’s start with a class Thing.
It will be a pointy shape drawn on the canvas, a thing with some encoded behaviour.
Put the following code in a new file called thing.js.
export default class Thing {
    constructor(x, y, size, hue) {
        this.x = x;
        this.y = y;
        this.size = size;
        this.fillStyle = `hsl(${hue}, 30%, 60%)`;
    }

    update(elapsed) {
    }

    draw(ctx) {
        ctx.save();
        ctx.fillStyle = this.fillStyle;
        ctx.translate(this.x, this.y);
        ctx.beginPath();
        ctx.arc(0, 0, this.size/2, Math.PI / 2, 1.5 * Math.PI)
        ctx.lineTo(this.size, 0);
        ctx.fill();
        ctx.restore();
    }
}
We have defined a Thing class.
Notice the keywords export default.
Modules can choose to selectively make their classes, functions and variables available for import in other modules.
In this case we are exporting our Thing class.
This means other modules can easily import this class from the thing.js module.
Our class has a Thing.constructor method that requires coordinates x and y, a size and a hue.
The x and y coordinates are allocated to this.x and this.y.
Similarly, the size argument is allocated to this.size.
The hue argument is used to set the this.fillStyle property to an hsl colour.
From all this, we can imaging that our instances will have unique locations on the canvas, and they will each be a different size and colour.
There is an Thing.update() method which does nothing.
There is an Thing.draw() method which takes a single ctx argument and draws a half-circle with a point facing to the right (which is zero radians, importantly).
So we can see, instances of our Thing class will know their position and will know how to draw themselves.
Later, we will add logic so they also know how to behave.
But this code alone won’t do anything. For a start, we haven’t even loaded this script. Our things will need to be instantiated by some higher-level code.
An object to manage everything in the scene
The next step is to create another object which represents our entire scene.
This object will manage Thing instances as data.
Put this code in a new file scene.js.
import Thing from './thing.js';

export default class Scene {
    constructor(nThings, canvas) {
        this.things = Array.from({length: nThings}, () => {
            return new Thing(
                Math.random() * canvas.width,  // x
                Math.random() * canvas.height, // y
                20 + Math.random() * 10,       // size
                Math.random() * 360            // hue
            );
        });
    }

    update(elapsed) {
        this.things.forEach(thing => {
            thing.update(elapsed);
        });
    }

    draw(ctx) {
        ctx.clearRect(0, 0, ctx.canvas.width, ctx.canvas.height);
        this.things.forEach(thing => {
            thing.draw(ctx);
        });
    }
}
The first line imports our Thing class from thing.js.
The code then declares a Scene class.
It has a Scene.constructor method which takes two arguments. The nThings argument specifies the number of things we want in our scene.
The canvas argument is a canvas element which will give us our maximum coordinates.
The Scene.constructor method does one thing.
It creates an array of Thing instances with random coordinates, random sizes and random hues.
When a scene is created, the number of Thing instances can be set with the nThings argument.
The Scene.update method simply loops over the array of things and calls each of their update methods in turn.
It passes the provided elapsed argument as a parameter.
The Scene.draw method is similar, it first clears the canvas, then it loops over the array of things and calls each of their draw methods in turn.
Again, passing the ctx argument as a parameter.
Still, this code isn’t even imported yet.
Running the game loop
We still haven’t loaded any of this code, we need to put some code into scripts.js to bootstrap the system.
Here’s all we need. Add this to scripts.js.
import Scene from './scene.js';

const ctx = canvas.getContext("2d");
const scene = new Scene(100, canvas);

let p;
function frame(ts) {
    const elapsed = ts - p || 0;
    scene.update(elapsed / 1000);
    scene.draw(ctx);
    p = ts;
    requestAnimationFrame(frame);
}
requestAnimationFrame(frame);
Study this. It should be familiar, with a few minor changes.
We now import the Scene class and create an instance, scene.
We then have a stripped down frame() function that simply calculates the elapsed time and delegates all the other work to the scene object.
This should be enough to produce a working system. You should see something like this.
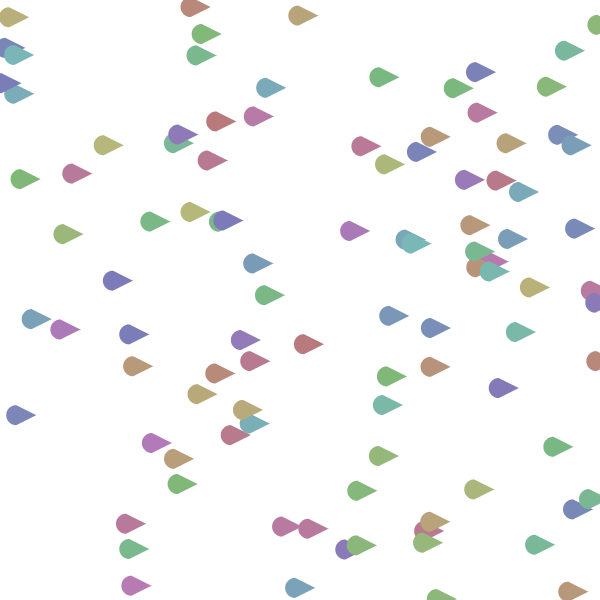
We now have a system that will create a Scene class and animate the scene using requestAnimationFrame.
The Scene instance initialises and animates all the objects in the scene, maintaining a clear separation of update operations and drawing operations.
For now the Scene class only creates instances of the Thing class.
Later, we can add more object types easily.
Adding more properties
Our Thing class is being animated, but the Thing.update method doesn’t do anything.
Before we add behaviour, we’ll add an angle property, so each Thing points in a random direction.
Here’s the updated Thing.constructor method.
    constructor(x, y, size, hue, angle) {
        this.x = x;
        this.y = y;
        this.size = size;
        this.fillStyle = `hsl(${hue}, 30%, 60%)`;
        this.angle = angle;
    }
And we can pass in a randomised angle for now in the Scene.constructor method.
    constructor(nThings, canvas) {
        this.things = Array.from({length: nThings}, () => {
            return new Thing(

                Math.random() * canvas.width,  // x
                Math.random() * canvas.height, // y
                20 + Math.random() * 10,       // size
                Math.random() * 360,           // hue
                Math.random() * 2 * Math.PI    // angle
            );
        });
    }
Keeping the randomisation separate means we can change the
Sceneto create something more intentional if we want. We shall see this later.
Now we have an angle, we can update the Thing.draw method to rotate the canvas accordingly.
    draw(ctx) {
        ctx.save();
        ctx.fillStyle = this.fillStyle;
        ctx.translate(this.x, this.y);
        ctx.rotate(this.angle);
        ctx.beginPath();
        ctx.arc(0, 0, this.size/2, Math.PI / 2, 1.5 * Math.PI)
        ctx.lineTo(this.size, 0);
        ctx.fill();
        ctx.restore();
    }
Now we can see the things are all pointing in different directions.

Thing behaviour
So, we have these things, but they don’t do anything.
This is because their update() method is empty.
Here’s some code that makes them rotate somewhat randomly (in a clamped random walk).
First, we initialise a rotationRate property in the Thing.constructor.
    constructor(x, y, size, hue, angle) {
        this.x = x;
        this.y = y;
        this.size = size;
        this.fillStyle = `hsl(${hue}, 30%, 60%)`;
        this.angle = angle;
        this.rotationRate = 0;
    }
We initialised it to zero, but then each frame, it is randomised in the new Thing.update method.
Then we use it to update the angle property (which will affect the rotation of our object).
    update(elapsed) {
        this.rotationRate += (Math.random() - 0.5);
        this.rotationRate = Math.max(this.rotationRate, -2 * Math.PI);
        this.rotationRate = Math.min(this.rotationRate, 2 * Math.PI);
        this.angle += this.rotationRate * elapsed;
    }
First, we tweak the existing rotationRate (a bit like randomly moving the steering wheel).
(Math.random - 0.5)is a common way to get a random value between-0.5and+0.5. Adding this to therotationRateeach frame creates a random walk.
Then we clamp the rotationRate so it doesn’t go outside a predefined range.
This is much better than just randomising the angle property directly.
We clamp the rotationRate to one rotation per second in either direction.
So it doesn’t get out of control.
feel free to let the
rotationRateget larger, the things will spin faster. Or restrict it even more, so the things don’t turn much.
You should see the things rotating in a satisfyingly random way.
Moving
Now we are going to have the things move forwards.
So we need to add a speed property to our Thing.constructor.
    constructor(x, y, size, hue, angle) {
        this.x = x;
        this.y = y;
        this.size = size;
        this.fillStyle = `hsl(${hue}, 30%, 60%)`;
        this.angle = angle;
        this.rotationRate = 0;
        this.speed = 100;
    }
Moving them in the direction they are pointing requires some simple trigonometry.
We will define what are known as getter methods for Thing.xSpeed and Thing.ySpeed using the get keyword.
These are calculated values based on Thing.speed and Thing.angle, so we can define these getter methods to make our Thing.update code simpler.
    get xSpeed() {
        return Math.cos(this.angle) * this.speed;
    }
    get ySpeed() {
        return Math.sin(this.angle) * this.speed;
    }
getter methods are very much like the
@propertydecorator in python. They allow a method to be accessed like a dynamic property (without calling).
Now, we can add these values on to our x and y coordinates within our Thing.update method.
    update(elapsed) {
        this.rotationRate += (Math.random() - 0.5);
        this.rotationRate = Math.max(this.rotationRate, -2 * Math.PI);
        this.rotationRate = Math.min(this.rotationRate, 2 * Math.PI);
        this.angle += this.rotationRate * elapsed;
        this.x += this.xSpeed * elapsed;
        this.y += this.ySpeed * elapsed;
    }
Check out the canvas now. You should see the things moving around with smooth steering because we used the clamped random walk.
Finally, if you wait long enough, the things start disappearing off the side of the canvas. Fixing this is left as an exercise for you.
Defining a different object
Let’s define another class for a different object type. Create a file follower.js and add the following code.
export default class Follower {
    constructor(x, y, speed, target) {
        this.target = target;
        this.speed = speed;
        this.x = x;
        this.y = y;
    }

    get angle() {
        const dy = this.target.y - this.y;
        const dx = this.target.x - this.x;
        return Math.atan2(dy, dx);
    }

    get xSpeed() {
        return Math.cos(this.angle) * this.speed;
    }
    get ySpeed() {
        return Math.sin(this.angle) * this.speed;
    }

    update(elapsed) {
        this.x += this.xSpeed * elapsed;
        this.y += this.ySpeed * elapsed;
    }

    draw(ctx) {
        ctx.save();
        ctx.strokeStyle = this.target.fillStyle;
        ctx.lineWidth = 2;
        ctx.translate(this.x, this.y);
        ctx.rotate(this.angle);
        ctx.beginPath();
        ctx.moveTo(-10, 0);
        ctx.lineTo(10, 0);
        ctx.moveTo(5, -5);
        ctx.lineTo(10, 0);
        ctx.lineTo(5, 5);
        ctx.stroke();
        ctx.restore();
    }
}
Study this object carefully.
One thing you should notice about the constructor is that is takes a target as an argument and stores it as a property.
This is because the behaviour of this object is to follow its this.target, which must be an object with x and y properties.
The angle is where this core logic is implemented.
We use Math.atan2 to calculate the angle between our own location and the target we are following.
This means we always point directly towards our target.
The this.angle property feeds into the xSpeed and ySpeed properties which are calculated based on this.angle and this.speed.
If we follow the logic from the update() method, we can see tha this means we always move in the direction we are pointing.
The draw() method simply draws an arrow.
We also take on the target.fillStyle as our strokeStyle, which indicates that our target value should probably be a Thing instance.
Integrating it into our scene
Integrating our new object type into our Scene is pretty easy.
We will create a new Array of Follower instances, one for each Thing.
Then we simply update and draw each one.
import Thing from './thing.js';
import Follower from './follower.js';

export default class Scene {
    constructor(nThings, canvas) {
        this.things = Array.from({length: nThings}, () => {
            return new Thing(
                Math.random() * canvas.width,
                Math.random() * canvas.height,
                20 + Math.random() * 10,
                Math.random() * 360,
                Math.random() * 2 * Math.PI
            );
        });
        this.followers = this.things.map((thing) => {
            return new Follower(
                canvas.width / 2,
                canvas.height / 2,
                thing.speed / 2, thing
            );
        });
    }

    draw(ctx) {
        ctx.clearRect(0, 0, ctx.canvas.width, ctx.canvas.height);
        this.followers.forEach(thing => {
            thing.draw(ctx);
        });
        this.things.forEach(thing => {
            thing.draw(ctx);
        });
    }

    update(elapsed) {
        this.things.forEach(thing => {
            thing.update(elapsed);
        });
        this.followers.forEach(thing => {
            thing.update(elapsed);
        });
    }
}
Notice that we used the Array.map method to create an array of Follower objects containing exactly one for each Thing.
We also ensure that the Follower is much slower then the Thing by setting its speed to thing.speed / 2.
The
Followerobjects are much more manoeuvrable and so they can catch up when theirtargetis turning.
Try it yourself
Build your own example, using a simple
frame()function andSceneclass.Take some time to think about what you want to build.
Take it slowly, start as simple as possible.
- Consider the data your system will need.
- Implement the minimum possible, just to get something on the canvas.
- Gradually add features, one by one.
Evolve your code towards something you would be proud to submit for the assignment.