setInterval
We can use setInterval to run code regularly…10
<p>
    We <em>can</em> use <code>setInterval</code> to run code regularly...
    <span id="target"></span>
</p>
count = 10;
function countDown() {
    if(count) {
        target.textContent = count;
        count--;
    } else {
        target.textContent = `Go!`;
        count = 10;
    }
}
setInterval(countDown, 1000);
Animation
To animate, we can call the function repeatedly using setInterval.
<canvas id="example1" width="900" height="50" style="background: #eee; border: 3px solid black;"></canvas>
let ctx = example1.getContext("2d"), timer, x = 20, dx = 5;
function draw1() {
    ctx.clearRect(0, 0, example1.width, example1.height);
    ctx.fillRect(x - 10, 10, 30, 30);
    x = (x + dx) % example1.width;
}
draw1();
interval.addEventListener('input', ev => {
    clearInterval(timer);
    if(interval.value == "1000") {
        timer = null;
        intervalLbl.textContent = "(off)";
    } else {
        timer = setInterval(draw1, interval.value);
        intervalLbl.textContent = `${interval.value}ms`;
    }
});
RequestAnimationFrame
The setInterval() approach adds our frame() function to the event loop regularly.
But a better approach is to use requestAnimationFrame which we call whenever we ant an new frame to be drawn.
<canvas id="example2" width="900" height="50" style="background: #eee; border: 3px solid black;"></canvas>
let ctx2 = example2.getContext("2d"), play = false;
function draw2() {
    ctx2.clearRect(0, 0, example2.width, example2.height);
    ctx2.fillRect(x - 10, 10, 30, 30);
    x = (x + dx) % example2.width;
    if(play) requestAnimationFrame(draw2);
}
draw2();
example2.addEventListener('click', ev => {
    if(play) {
        play = false;
    } else {
        play = true;
        requestAnimationFrame(draw);
    }
});
The timestamp parameter
Our frame() callback is being passed a single parameter.
The time (in milliseconds) since the page loaded.
let p, msg;
function showTimestamp(ts) {
    const elapsed = ts - p || 0;
    if(p) {
        msg = `from ${p.toFixed(2)} to ${ts.toFixed(2)} = ${elapsed.toFixed(2)}.`;
    } else {
        msg = `first frame: ${ts.toFixed(2)}.`;
    }
    message.textContent = msg;
    p = ts;
}
timestampBtn.addEventListener('click', ev => {
    requestAnimationFrame(showTimestamp);
});
Scene data
We can generate complex data quite easily if we take care.
First, a function to create one data object.
function randomThing() {
    return {
        x: Math.random() * example3.width,
        y: Math.random() * example3.height,
        xSpeed: Math.random() * example3.width,
        ySpeed: Math.random() * example3.height,
    }
}
Then we can create any number of these using Array.from.
const things = Array.from({length: 10}, randomThing);
For a more complex scene, we need more complex data.
An update() function
We also need an update() function to modify the data.
function update3(elapsed) {
    things.forEach(thing => {
        thing.x += thing.xSpeed * elapsed;
        thing.y += thing.ySpeed * elapsed;
        if(thing.x < 0) {thing.x = example3.width;}
        if(thing.y < 0) {thing.y = example3.height;}
        if(thing.x > example3.width) {thing.x = 0;}
        if(thing.y < example3.height) {thing.y = 0;}
    });
}
This defines the behaviour of our things.
They move at their own speed and wrap around the canvas.
A draw() function
We need a draw() function to draw the scene.
function draw3(ctx) {
    ctx.clearRect(0, 0, example3.width, example3.height);
    things.forEach(thing => {
        ctx.save();
        ctx.translate(thing.x, thing.y);
        ctx.strokeStyle = 'blue';
        ctx.beginPath();
        ctx.rect(-5, -5, 10, 10)
        ctx.stroke();
        ctx.strokeStyle = 'red';
        ctx.beginPath();
        ctx.moveTo(-15, -15);
        ctx.lineTo(15, 15);
        ctx.moveTo(-15, 15);
        ctx.lineTo(15, -15);
        ctx.stroke();
        ctx.restore();
    });
}
The result
<canvas id="example3" width="200" height="200" style="background: #eee; border: 3px solid black;"></canvas>
const ctx3 = example3.getContext("2d");
const things = Array.from({length: 10}, randomThing);
let p3, play3 = false;

function frame3(ts) {
    const elapsed = ts - p3 || 0;
    update3(elapsed / 1000);
    draw3(ctx3);
    p3 = ts;
    if(play3) requestAnimationFrame(frame3)
}

btn3.addEventListener('click', ev => {
    play3 = !play3;
    btn3.textContent = "Play";
    if(play3) {
        btn3.textContent = "Pause";
        p3 = undefined;
        requestAnimationFrame(frame3);
    }
});
A simple class
class Square {
    constructor(x, y, xSpeed, ySpeed) {
        this.x = x;
        this.y = y;
        this.xSpeed = xSpeed;
        this.ySpeed = ySpeed;
    }
    draw(ctx) {
        ctx.save();
        ctx.translate(this.x, this.y);
        ctx.strokeStyle = 'blue';
        ctx.strokeRect(-5, -5, 10, 10);
        ctx.strokeStyle = 'red';
        ctx.beginPath();
        ctx.moveTo(-15, -15);
        ctx.lineTo(15, 15);
        ctx.moveTo(-15, 15);
        ctx.lineTo(15, -15);
        ctx.stroke();
        ctx.restore();
    }
    update(elapsed) {
        this.x += this.xSpeed * elapsed;
        this.y += this.ySpeed * elapsed;
    }
}
A Scene class to handle the whole thing
class Scene {
    constructor(width, height) {
        this.width = width;
        this.height = height;
        this.squares = Array.from({length: 20}, () => {
            return new Square(
                Math.random() * this.width, Math.random() * this.height,
                (Math.random() - 0.5) * this.width, (Math.random() - 0.5) * this.height,
            );
        });
    }
    update(elapsed) {
        this.squares.forEach(sq => {
            sq.update(elapsed);
            if(sq.x < 0) {sq.x = this.width;}
            if(sq.y < 0) {sq.y = this.height;}
            if(sq.x > this.width) {sq.x = 0;}
            if(sq.y > this.height) {sq.y = 0;}
        });
    }
    draw(ctx) {
        ctx.clearRect(0, 0, this.width, this.height);
        this.squares.forEach(sq => sq.draw(ctx));
    }
}
More structured code makes things easier
const ctx4 = example4.getContext("2d");
const scene = new Scene(example4.width, example4.height);

let p4;
function frame(ts) {
    const elapsed = ts - p4 || 0;
    p4 = ts;
    scene.update(elapsed / 1000);
    scene.draw(ctx4);
    requestAnimationFrame(frame);
}
requestAnimationFrame(frame);
Structuring code across multiple files
Using ES6 modules allows you to place each class in its own folder.
Just add type="module" attribute to script (can be in <head>).
<script src="scripts.js" type="module"></script>
Add import statements to scripts.js.
import MyClass from './myclass.js';
import { Class1, func2 } from './stuff.js';
Add export default statements in myclass.js.
export default class MyClass {}
Add export statements in stuff.js.
export class Class1 {}
export function func2() {}
Check out some more example code
A simple example and a more complex game with collision detection.
The links above go to the playable games, the code is all in our github repository.
Check out some more example code
The platform game is a demonstration of using the pixel data from a phantom canvas. The shooter is just a simple example with three game object classes (player, bullet and enemy) and very basic collision detection.
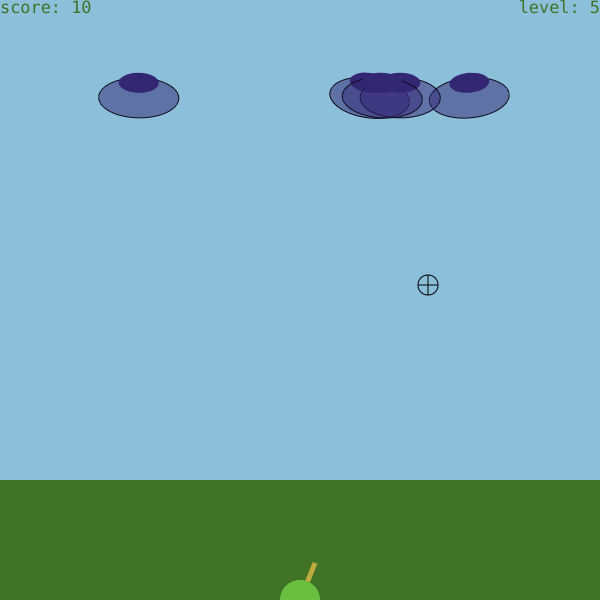
The links above go to the playable games, the code is all in our github repository.