
Lab 5.1: Introduction to JavaScript
Part of Week 5: Introducing JavascriptGeneral setup
For all lab exercises you should create a folder for the lab somewhere sensible.
Assuming you have a GAMR1520-labs folder, you should create a GAMR1520-labs/week_5 folder for this week and a GAMR1520-labs/week_5/lab_5.1 folder inside that.
JavaScript setup
Though it is possible to contain everything within one file, a JavaScript project will usually contain a collection of multiple files.
GAMR1520-labs
└─ week_5
    └─ lab_5.1
        ├─ experiment1
        │    ├─ index.html
        │    └─ scripts.js
        └─ experiment2
             ├─ index.html
             └─ scripts.js
For simple projects, there will always be an index.html and the javascript file can always be something like scripts.js, though you can choose your own names. Using the same template for multiple examples is convenient. Try to name your folders better than this, the folder name should reflect their content. For example, blank_template, edit_elements or simple_drawing.
Resources
If you want to find out more information about any aspect of web development, the best resource is the Mozilla Developer Network web documents, in particular the JavaScript documentation will be invaluable for this module.
General approach
As you encounter new concepts, try to create examples for yourself that prove you understand what is going on. Try to break stuff, its a good way to learn. But always save a working version.
Modifying the example code is a good start, but try to write your own programmes from scratch, based on the example code. They might start very simple, but over the weeks you can develop them into more complex programmes.
Think of a programme you would like to write (don't be too ambitious). Break the problem down into small pieces and spend some time each session trying to solve a small problem.
A basic HTML template
To use JavaScript in the browser, we first need to create an HTML document. This is the file that the browser loads (usually from a remote server, but we will start by loading it locally).
Obviously we can no longer use IDLE. Make sure you are using VSCode or similar for this. VSCode is an excellent choice for web development.
You should have already created a folder for this lab. Open the folder in VSCode so that you can see the file manager. In web development we will often have multiple files in a project. So, we should get into the habit of creating a folder for each project.
Create a folder called basic_template. Within this folder, create a file called index.html.
It is important that the file is created and named before this next step. VSCode will detect that the file is an HTML file and give us a set of HTML template options.
Open the file and type html.
You should see a set of options appear.
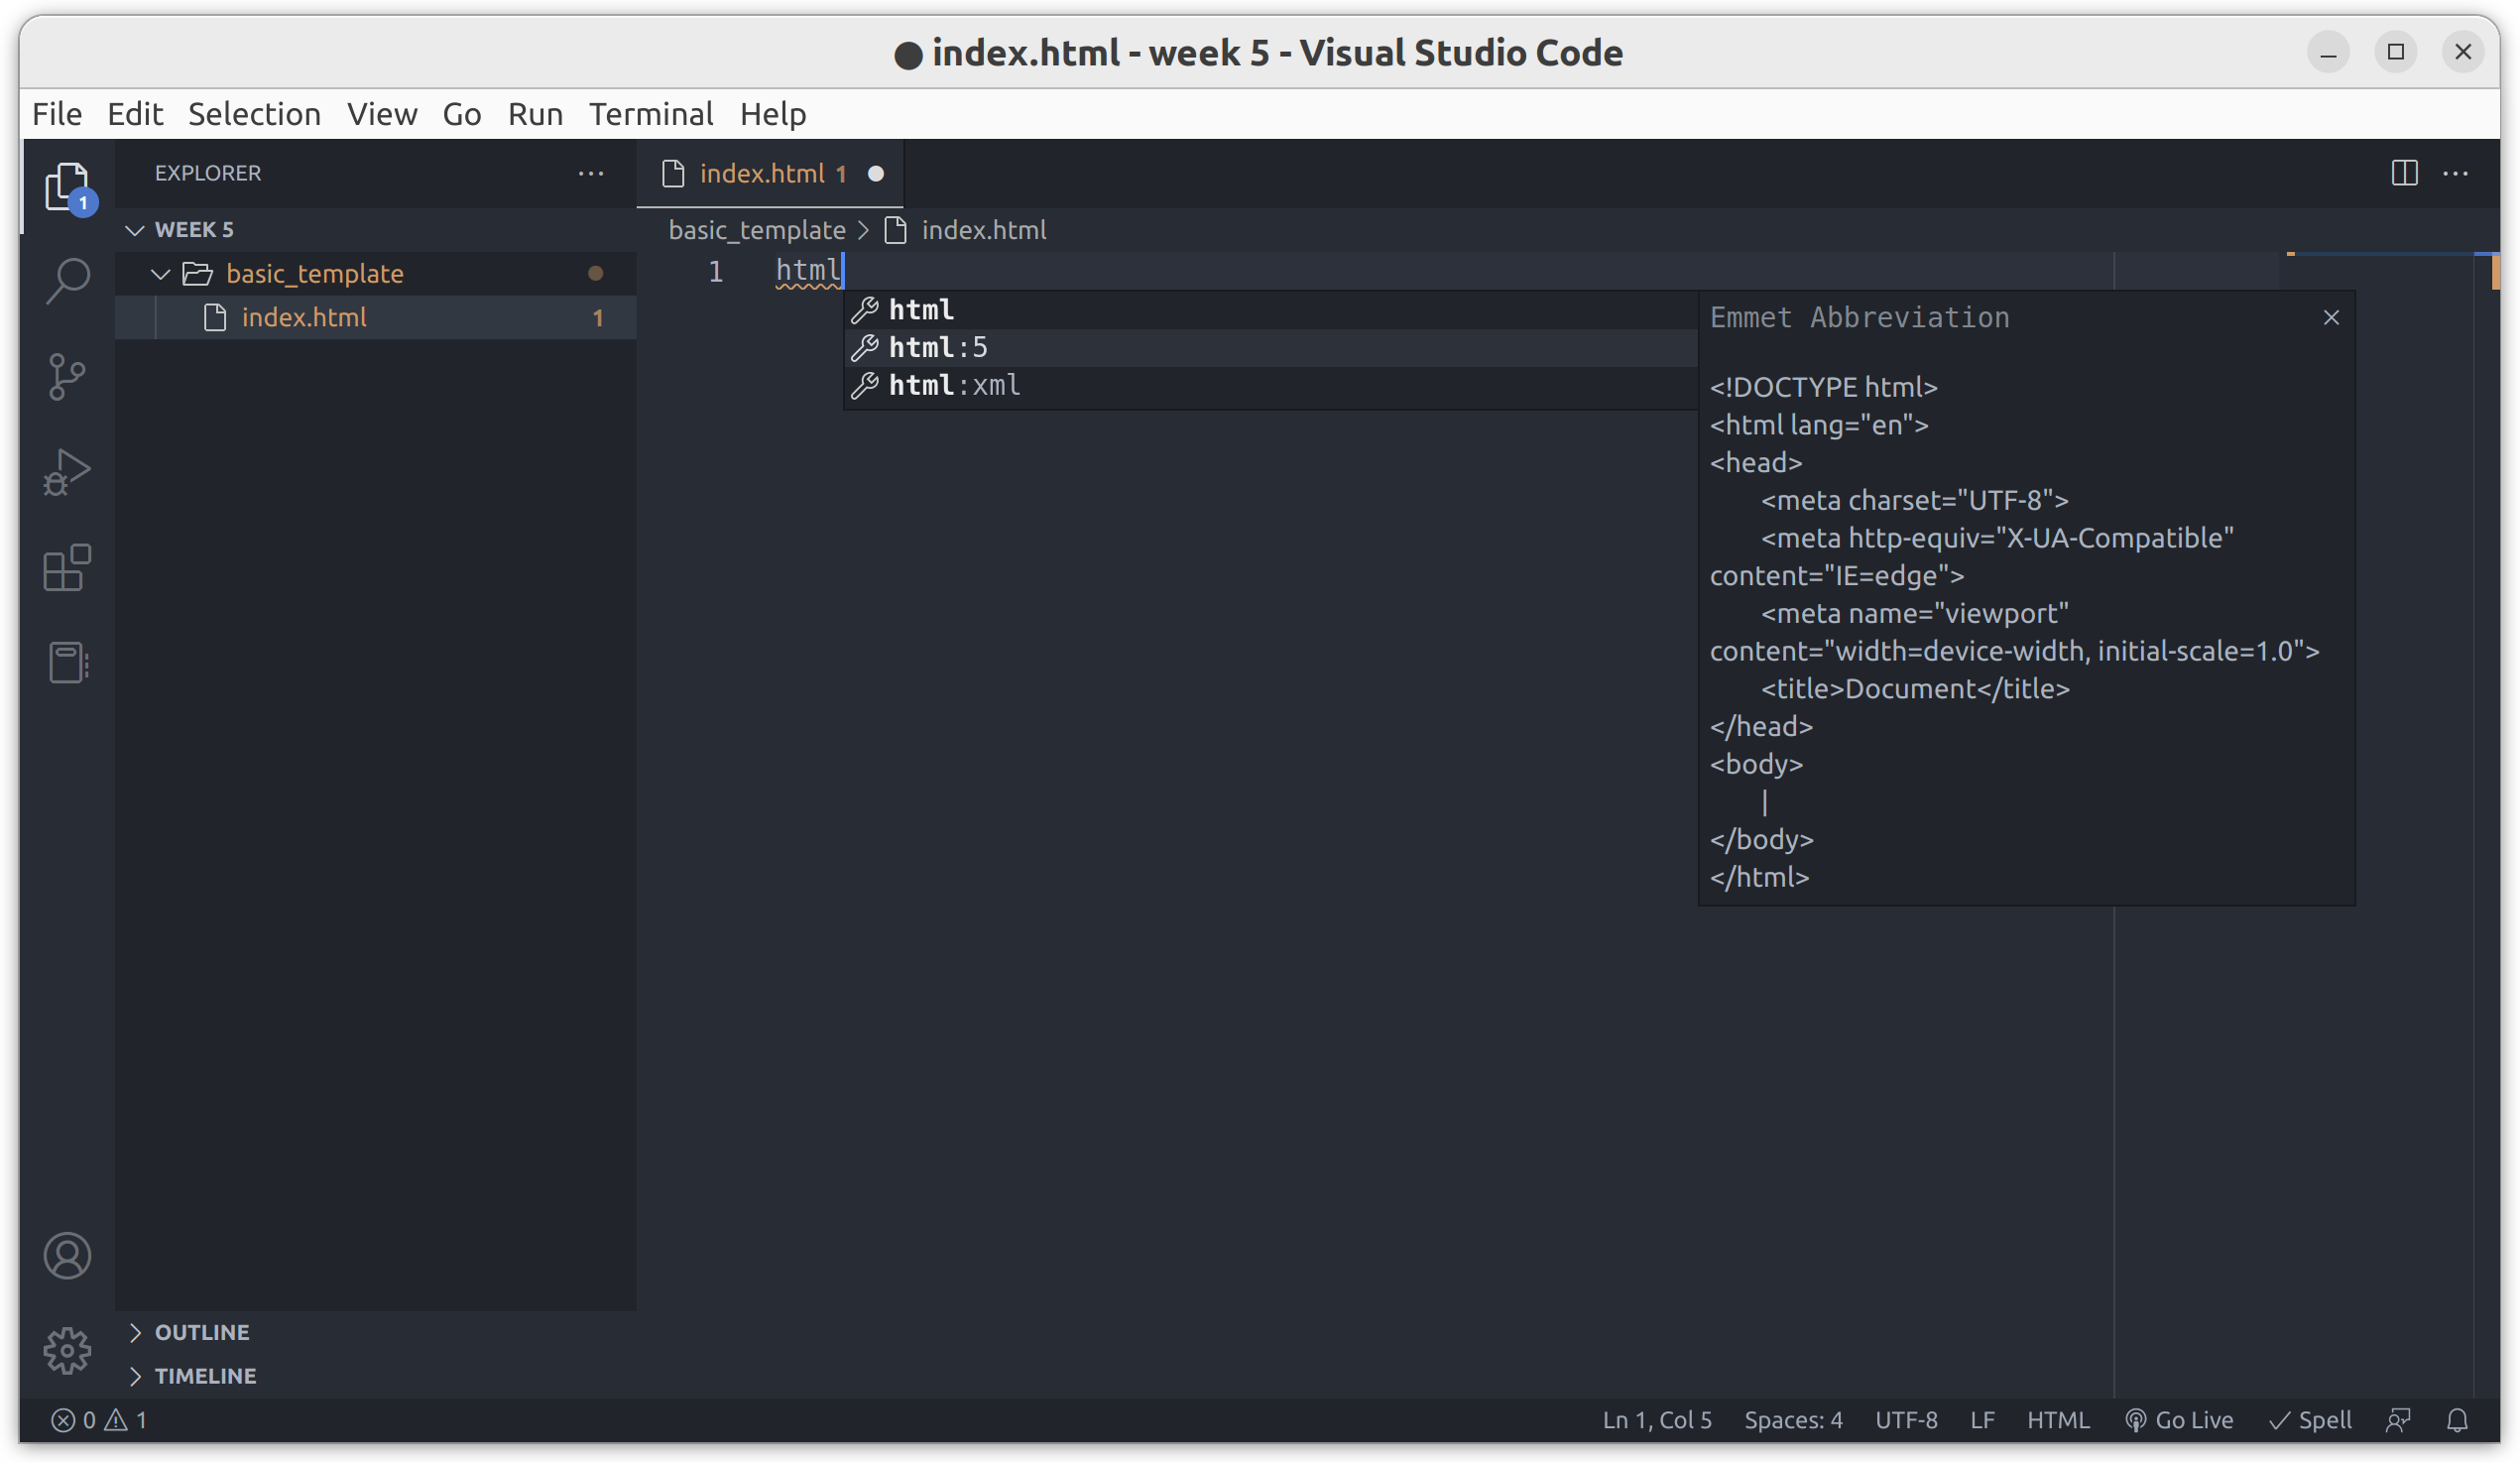
Select the html:5 option and press enter.
This feature is known as Emmet and is built into vscode by default. You will find that you can use it to save time and keystrokes. You can type the colon and the five to limit the options, notice that when you type anything, similar options appear. If you choose the wrong option, just clear the content and try again.
The automatic HTML5 template generated looks like this:
<!DOCTYPE html>
<html lang="en">
<head>
    <meta charset="UTF-8">
    <meta http-equiv="X-UA-Compatible" content="IE=edge">
    <meta name="viewport" content="width=device-width, initial-scale=1.0">
    <title>Document</title>
</head>
<body>

</body>
</html>
This is the HTML document that the browser will open, parse and render. It contains two things, a doctype and an html element.
The doctype
The doctype simply tells the browser which version of HTML to expect. Basically, you need this at the top of every HTML file.
<!DOCTYPE html>
In previous eras, this was a much more complex aspect of web development. Since HTML5 was released in 2008, the doctype declaration has become very simple.
The <html> element
The html code itself consists of nested elements.
The first element is the <html> element and it is the only top-level element.
The </html> closing tag is always the last thing in the file.
The opening tag also includes a lang="en" attribute.
<html lang="en">
This is always recommended, it indicates the main language of the content of the document.
Valid <html> elements can include only two elements, the <head> and the <body>.
The <head> element
In our template, the <head> looks like this.
<head>
    <meta charset="UTF-8">
    <meta http-equiv="X-UA-Compatible" content="IE=edge">
    <meta name="viewport" content="width=device-width, initial-scale=1.0">
    <title>Document</title>
</head>
The <head> element is where we put information about the document.
For example, we have three <meta> elements providing meta-data about how this page should be interpreted.
These meta-data are not important to understand, so don’t worry about it if this is confusing. The first tells the browser that the file is utf-8 encoded. The second is for older internet explorer browsers only, it tells them the document should be interpreted in the most modern compatibility mode available to the browser. The third element tells mobile browsers they should use the actual device width rather than simulating a larger device, which was the default behaviour when mobile browsers were new. These are good defaults, though older internet explorer browsers are now very rare so this can probably be dropped.
The final element is the <title> of the document.
This will not be visible in the page, but many browsers use this content to name the browser window or tab which is displaying the page.
Every document must have a <title> defined in the <head>.
The first change you could make is to change the title of your document.
The <body> element
This is where all the visible content of the site must go.
Content nested inside the <body> element will be visible on the page (unless it is made invisible using styles).
In our template, the <body> element is empty.
<body>

</body>
It’s worth noting at this point that most elements in HTML have opening and closing tags like the <title>.
<title>Document</title>
However, some elements (known as void elements) cannot contain any content.
These elements do not have a closing tag.
The <meta> element is a good example of this, but another common example is the <img> element.
<img src="myImage.png" alt="the text is used if the image cannot be viewed">
With all elements, the attributes can determine how the element is rendered by the browser.
Viewing the document and adding content
We recommend using google chrome, simply because this is by far the most popular browser.
Your browser can run local files but the minimalist design of modern browsers means there may not be an obvious way.
The file can be opened in a browser by various means.
- Drag and drop the tab from vscode onto a browser tab.
- Select the file in your OS file manager and double-click.
- Use ctrl + O in google chrome and select your file.
- Use the vscode run menu (which should open a new browser window).
Once you open the file, you should see nothing. Just a blank page. The title (in my case “Document”) will be visible in the browser tab.
To add some content, we can update our HTML <body> with some content.
<body>
    <h1>This is a document</h1>
    <p>Hello world!</p>
</body>
I’m going to ignore the
<html>and<head>elements to keep this simple, but don’t delete them from your file. You will need to replace your empty<body>element with the above code.
Return to your blank browser window and refresh the page (ctrl + R). You should see the new content appears.

The Document Object Model
The first thing we will look at is the Document Object Model (the DOM). The DOM is a data structure representing the HTML document.
When the browser loaded our document from the file, it built the DOM. Critically, though our file is static, the DOM (which is initialised from the data in our file) is dynamic and can be changed. We will use JavaScript to interact with the DOM and manipulate the data displayed in the browser.
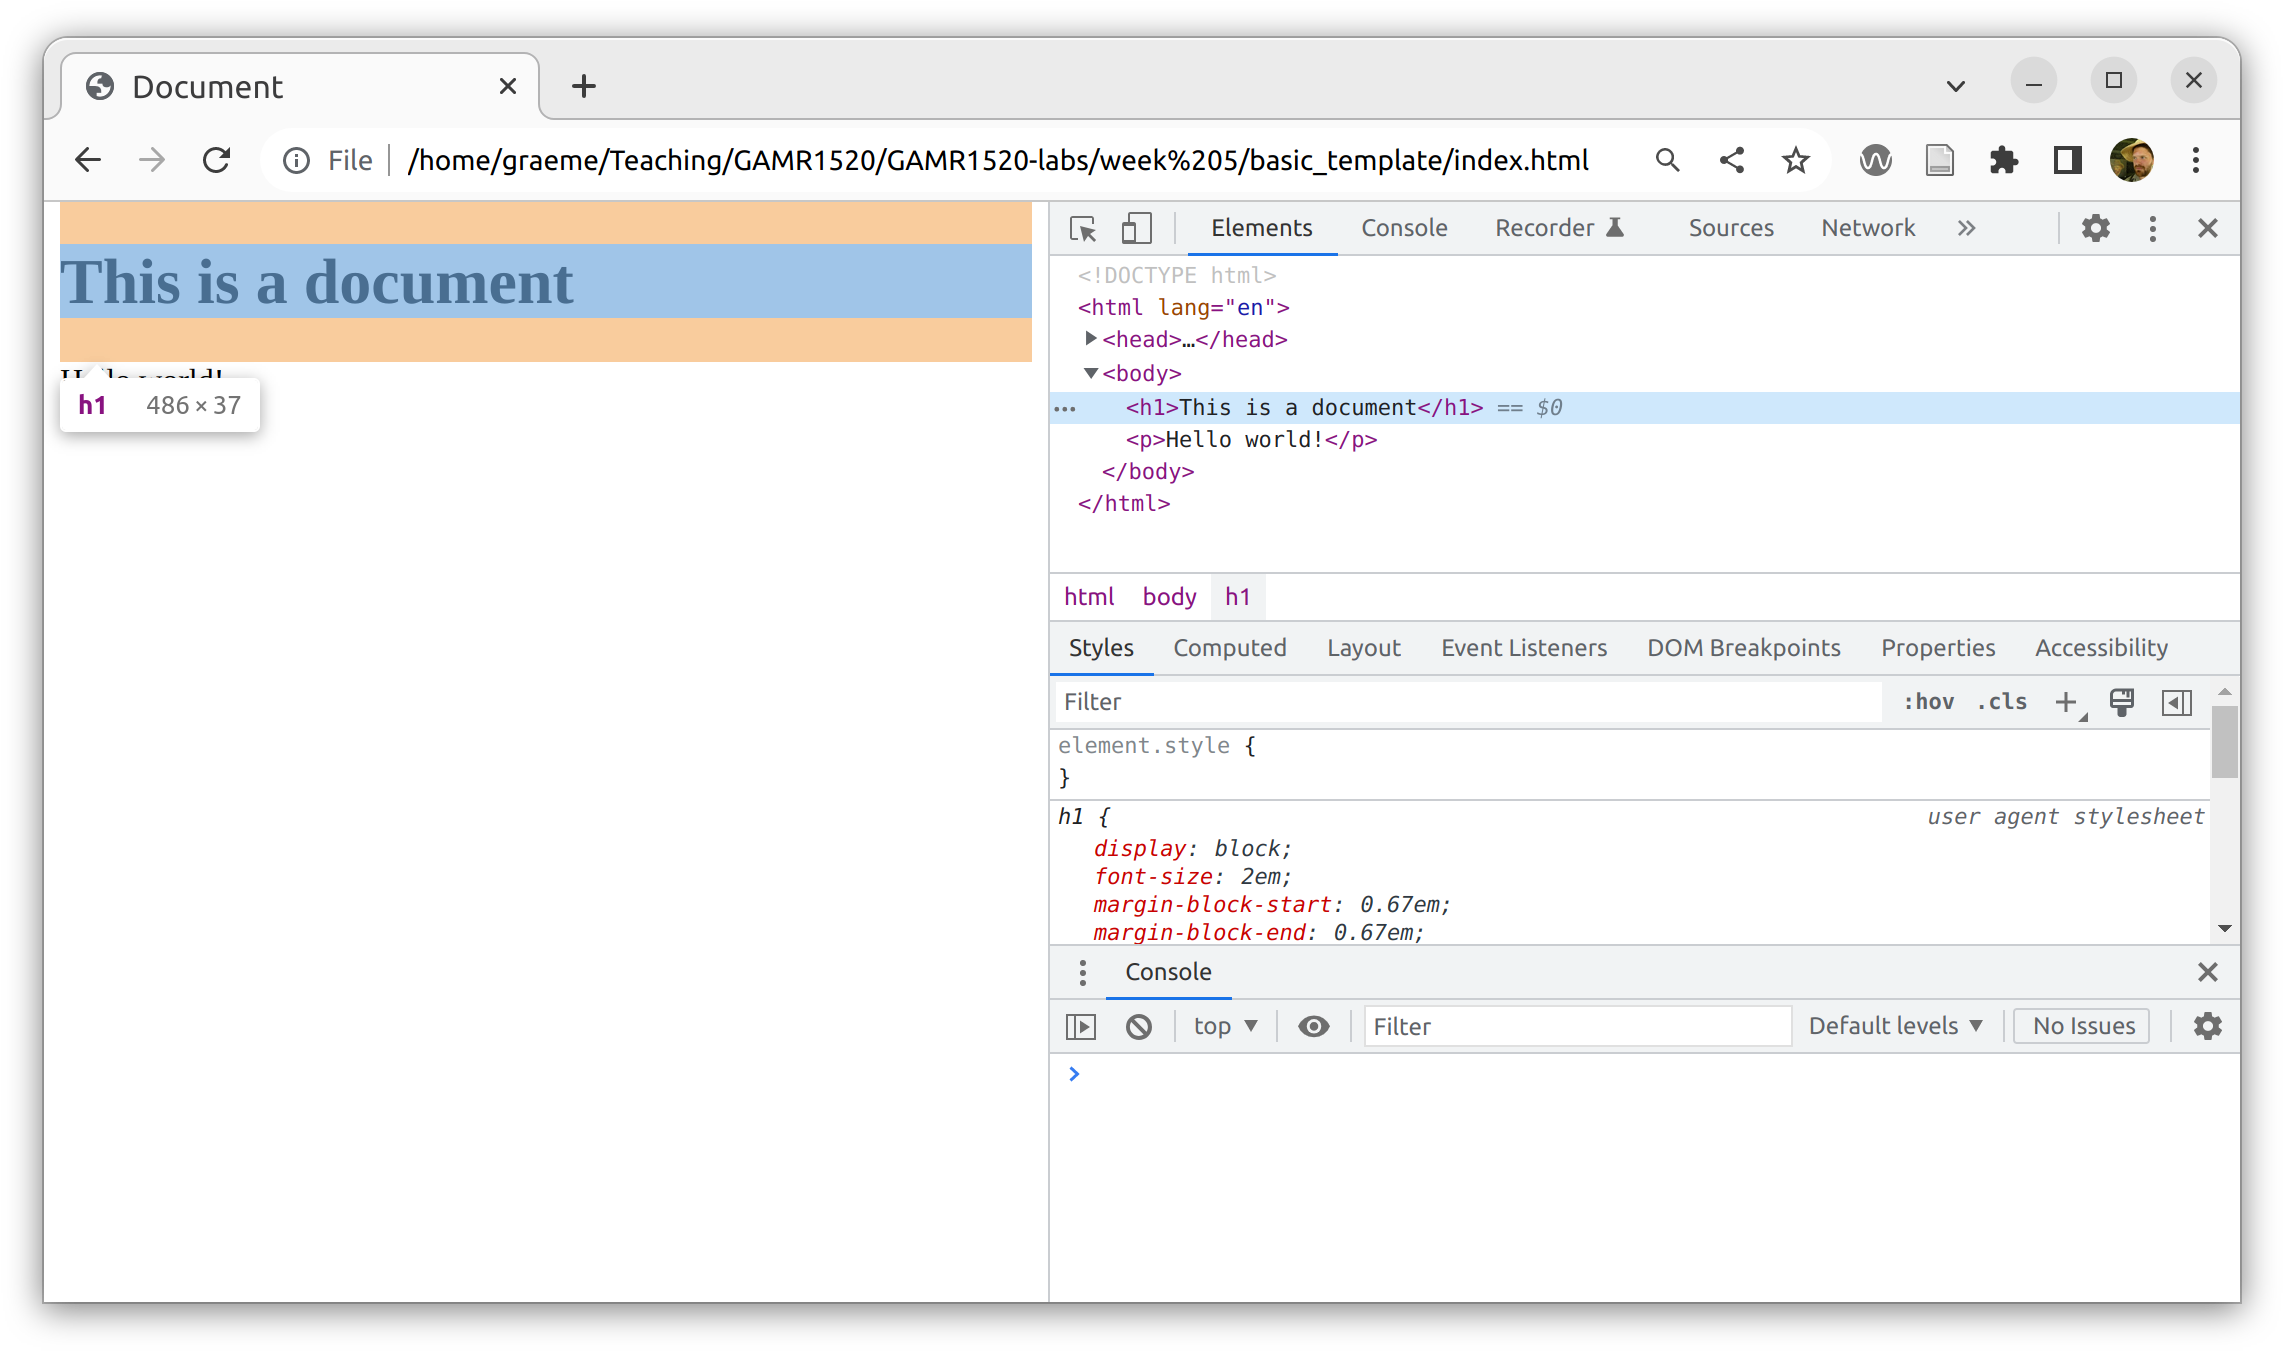
We are going to take this one step at a time. We will begin by viewing the DOM using the browser developer tools. In your browser window, press F12 to open the developer tools panel.
There are other common ways to do this, e.g. right-click on the page and choose inspect to highlight a particular element within the DOM.
The developer tools panel will open, it may look slightly different from the image below. Explore the options. You should find a representation of the DOM in the elements tab. It looks a lot like our document, with collapsible nested elements. If you select an element, you should see it highlighted on the page.
What about JavaScript?
There is also a console tab. This is where we can enter JavaScript commands. A lot like the interactive python prompt.
The browser developer tools are very powerful and include many features that we will not talk about. The crucial features we will use are the elements tab (which gives us a view into the DOM) and the console (which allows us to execute JavaScript, see errors and write log messages from our code).
Enter a JavaScript command into the console.
alert('hello world');
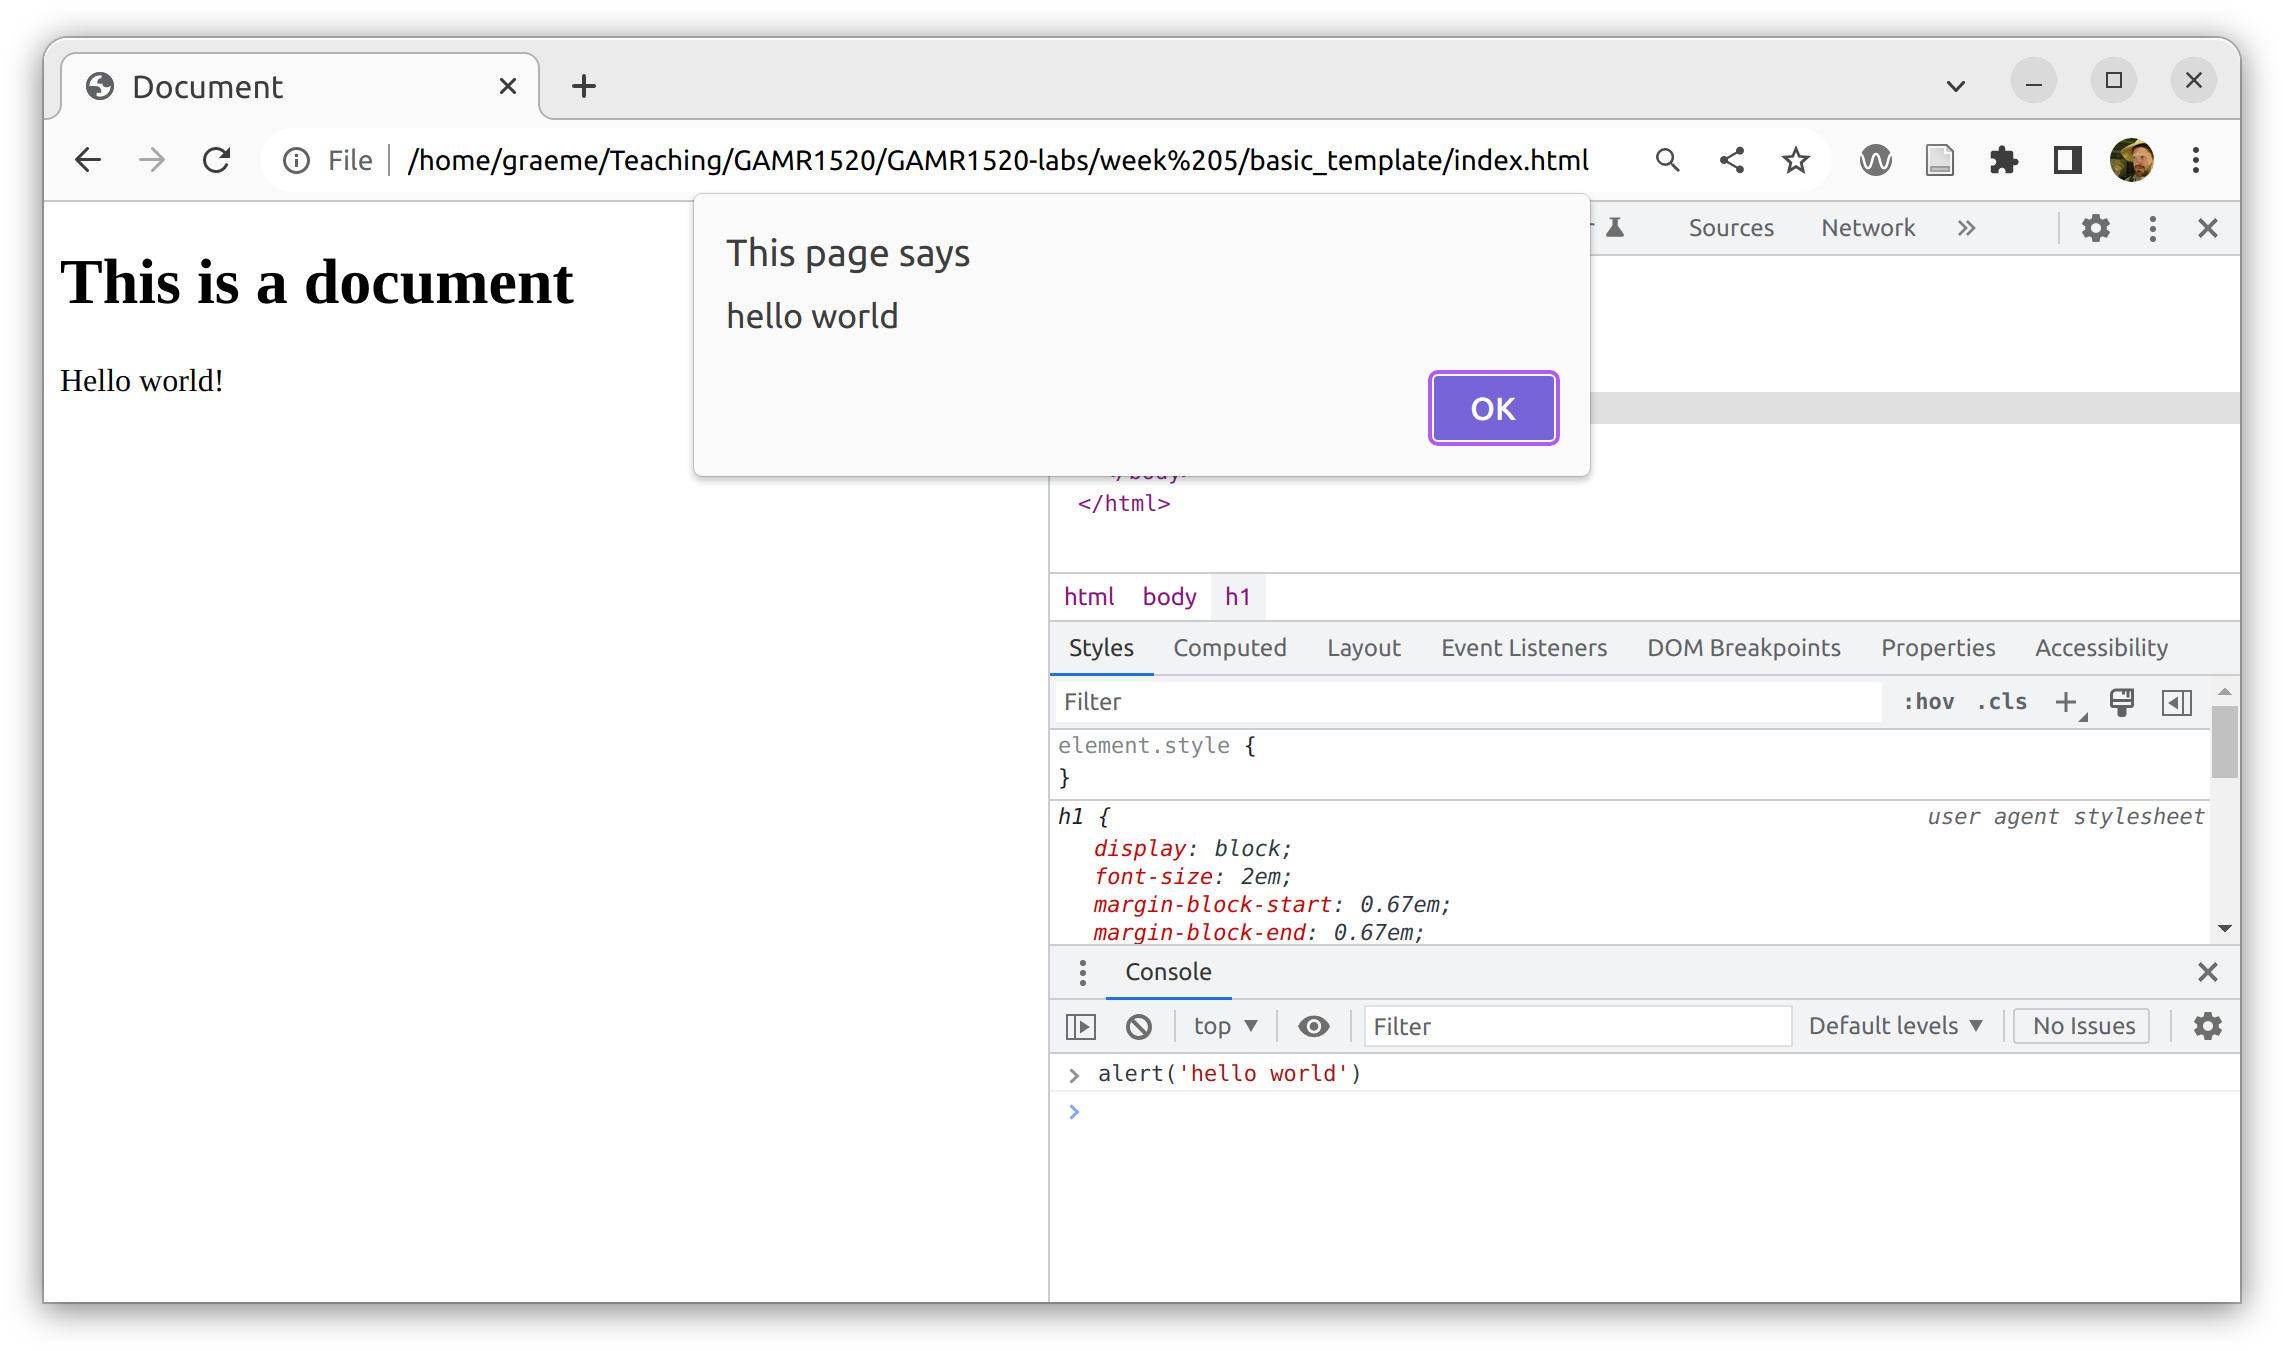
The alert() function is a crude way to send a message to users.
The user needs to dismiss the message by clicking OK.
Notice that, once the message is dismissed, the console shows the result of the function call.
In this case, the alert function does not return a value, so the result is undefined.
This is a value that represents no value, somewhat similar to None in python.
Literals
Just like python, JavaScript has literals. We can enter a literal value into the console and it will evaluate to itself. Try these commands in the console and see what you think.
Numbers are just numbers, there is no distinction between integers and floats.
100;
100
Strings are strings, obvs.
'hello world';
'hello world'
Booleans are lowercase (different from python - watch out for this).
true;
true
Variables and assignment
In each case above we created a value but we didn’t keep a reference to it, so once it was outputted to the console, it was immediately garbage collected.
JavaScript has three kinds of variables, declared with the var, let and const keywords.
The
varkeyword is best avoided for complex reasons. It is essentially a global variable and introduces more danger of creating naming clashes. The more tightly scopedletis always a better choice.You may see a lot of older code which uses
varon the internet. This is all from prior to 2015 and should be updated to useconstand/orletas appropriate.
Using const
Using const declares a variable that cannot be reassigned, we use the const keyword and the = operator.
const a = 1;
undefined
Now we have created a new constant a which is storing the value 1 for us.
The return value of the variable declaration is undefined.
Because we used const when we defined a, we cannot reassign it to another value.
const a = 1;
undefined
a = 'hello';
Uncaught TypeError: Assignment to constant variable.
Strictly speaking, a variable declared with
constis not guaranteed to be constant, but it will always point to the same object in memory. For example, anArraydeclared withconstcan have elements added and modified arbitrarily, but the variable is guaranteed to always point to the sameArray.
Using let
Using let creates a more flexible variable.
If you need a variable that can be reassigned then you must use the let keyword to declare your variable.
When declaring variables it is considered good practice to always use const where possible and only use let when declaring a variable that needs to be reassigned.
The following code may produce errors if
ahas already been declared as aconstfrom above. Refreshing the page (with ctrl + R) will clear all your variables from memory so you can start again.
let a = 1;
undefined
a = 2;
2
Again, the declaration returns undefined.
However, subsequent assignments do return the assigned value, so you will see output in the console for assignment.
Unlike const, it is not necessary to initialise a variable with a value when using let.
let a;
In this case, the value undefined is automatically assigned.
Of course, just like python, JavaScript is dynamically typed.
let a = 1;
a = 'hello';
'hello'
JavaScript is forgiving. It will allow you to miss off the
var,constorletkeyword when defining a variable. In which case, it will usevarby default which creates more danger of naming clashes. So it’s a good idea to always explicitly declare your variables.We will see later that it is possible to activate strict mode in your javascript files to enforce good practice.
Everything is an object
All values in JavaScript are objects, similar to python.
For example, we can see that a Number has the toString method.
a = 1
a.toString()
'1'
Though the data model is very different from python.
We will try to avoid going down this rabbit-hole. For now, know that every object has a prototype and that the object/prototype relationship is a bit like the instance/class relationship in python. In this case, the variable
ahas a prototype which implements theNumbermethods. You can see it by inspecting the__proto__property.a.__proto__When we ask our object
afor thetoStringproperty, it finds it on it’s prototype.
In JavaScript, simple object literals can be created and used a bit like python dictionaries.
We create them with curly braces.
const obj = {
    message: 'hello world',
    value: 100
}
Notice that the object keys are not quoted strings like they would be in python.
Objects are actually more similar to python classes, but we can skip the details for now.
We can access object properties using dot notation.
obj.message
'hello world'
Arrays
An Array is a special kind of object that acts a lot like a python list.
Array literals (like python lists) can be created using square brackets.
const arr = ['hello world', 1];
…or we can use the Array constructor.
const arr = new Array('hello world', 1);
We can access elements in an Array using square bracket notation.
arr[0];
'hello world'
We can append to an array using Array.push().
arr.push('something else');
3
The return value of the Array.push() method is the new length.
check that the array has been modified. Look up more about Arrays in the MDN documentation. For example, Array.concat() can be used to concatenate arrays.
The console gives a nice interactive view of data structures like arrays and objects. This can be very useful when a data structure contains a complex set of nested objects.

Experiment
Experiment with JavaScript in the console, get used to the basics.
- Try some simple expressions.
- Cause some errors
If anything strange happens, ask someone. Your lab tutor can help. If you get completely stuck, bring your question to the next lecture.
Remember, we are all learning together and we may not know the precise answer but we can certainly help you find the answer.
DOM manipulation
Go back to the elements tab in the developer console. Notice that the DOM elements are editable. Try double-clicking on the various elements in the DOM or right-clicking and selecting the various options.
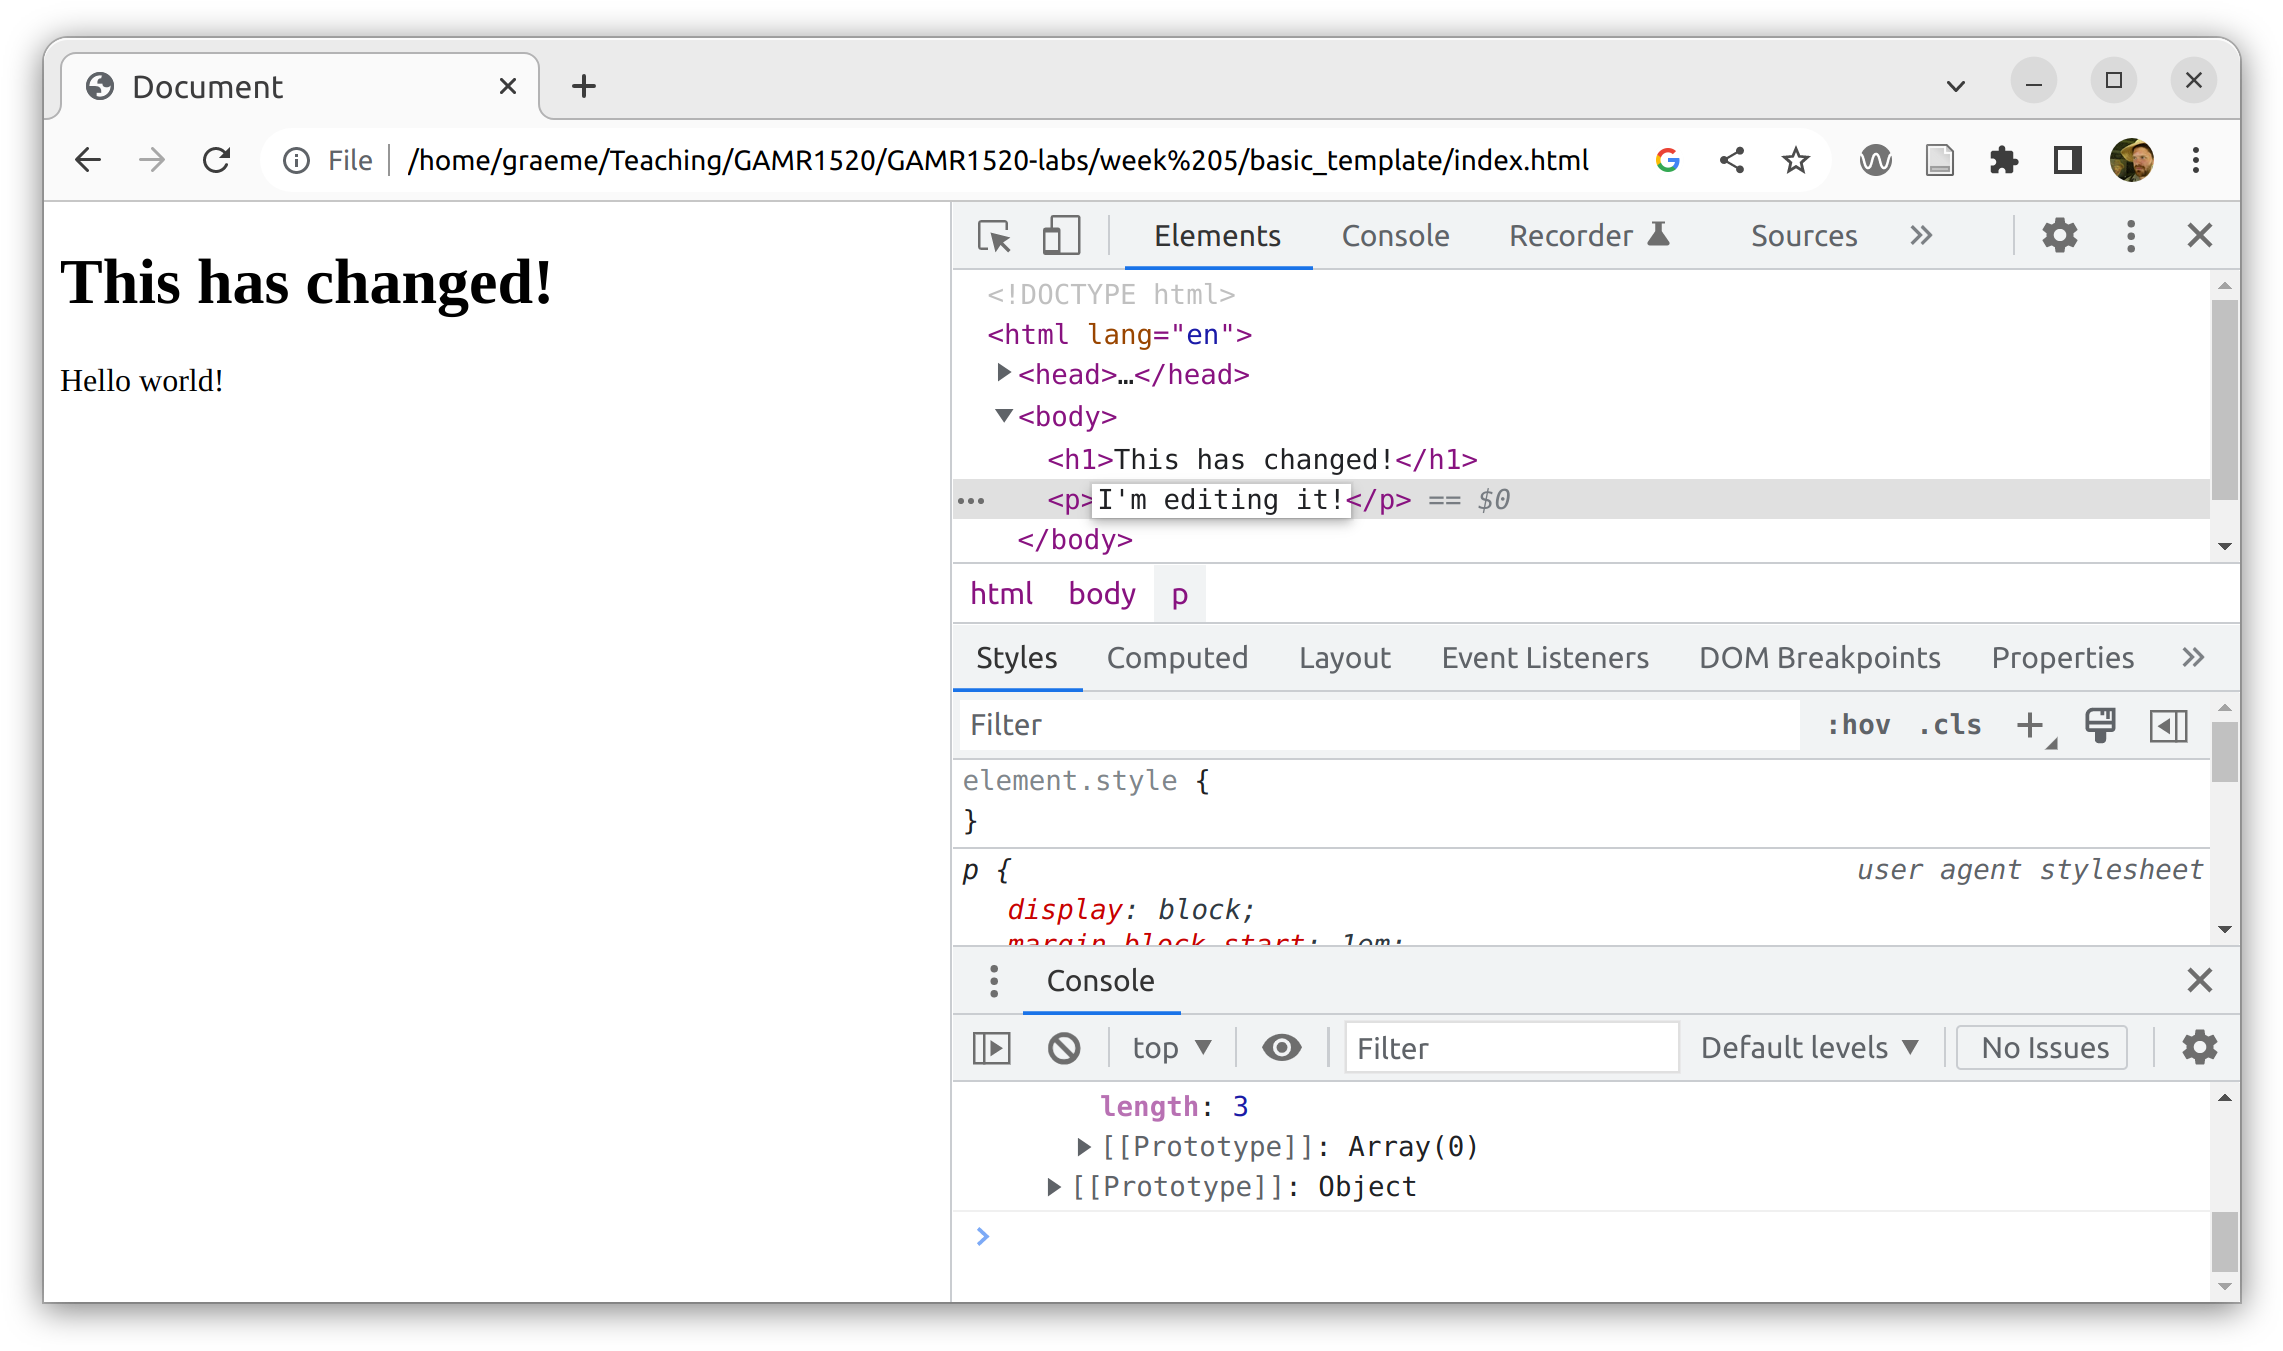
Editing the content is easy and if you confirm an edit (usually by pressing enter, or by clicking away from the HTML editor) then the page will update accordingly.
Meanwhile, our index.html document remains untouched and can be reloaded at any time using ctrl + R.
Similarly, we can use JavaScript to interact with the DOM.
In JavaScript, we interact with the DOM using the document object.
This is a built-in part of the browser context and basically represents the DOM.
Creating and inserting elements
Let’s say we want to add a new paragraph like this.
Don’t add this into the HTML file, we will use JavaScript to insert the new element.
<body>
    <h1>This is a document</h1>
    <p>Hello world!</p>
    <p>I'm a new paragraph!</p>
</body>
This requires three steps:
- Create a
<p>element - Set the content of the paragraph to
"I'm a new paragraph" - Insert the new
<p>element into the existing<body>.
First, we use document.createElement() to create the element.
const p = document.createElement('p');
Try inspecting the value of
p.
Then we set the textContent property of our newly created element.
p.textContent = "I'm a new paragraph";
Again, try inspecting the value of
pnow.
Notice, the new element is not in the page yet.
Finally, we append the new element to the end of the document.body.
document.body.append(p);
You should see the element has appeared in the page and in the elements tab of the developer tools.
Accessing and editing elements
To edit a particular element, we first need to find it in the DOM.
There are a number of ways to do this.
In most cases, if you want to use JavaScript in a document for this kind of thing, then the easiest option is to give your element an id attribute.
Let’s add a new element to our index.html file and give it the attribute id="target".
<body>
    <h1>This is a document</h1>
    <p>Hello world!</p>
    <p id="target">This content needs to change</p>
</body>
We want to get a reference to this element in JavaScript. We can do this with document.getElementById.
const element = document.getElementById('target');
Try inspecting the value of the variable
element.
We can read the existing textContent of our element.
element.textContent;
'This content needs to change'
It’s a simple matter to change the content.
element.textContent = "That's much better!";
Once again, notice that both the DOM (in the elements tab) and the page have been updated.
Scripts
It’s about time we stopped messing with the console and wrote some code into a file.
The console is an invaluable tool in JavaScript development. As an interactive tool it’s perfect for checking out ideas, inspecting the value of variables and confirming syntax. It’s also extremely useful for debugging, as we can log values to the console in our code.
Create a file called scripts.js in the basic_template folder, next to index.html. Add the following content to the file.
const arr = ['document.createElement', 'element.textContent', 'parent.append'];
const ol = document.createElement('ol');
for (const item of arr) {
    const li = document.createElement('li');
    li.textContent = item;
    ol.append(li);
}
document.body.append(ol);
Study the code and try to predict what it will do.
The script will not execute on it’s own. We need to include it in the document.
Update the <body> as follows:
<body>
    <h1>A simple pattern</h1>
    <script src="scripts.js"></script>
</body>
Now refresh the page (ctrl + R) and see what happened.
First, we declared an array of simple strings. This is the content for the list items we will insert into our ordered list.
const arr = ['document.createElement', 'element.textContent', 'parent.append'];
Then we created the ordered list (<ol>) element.
const ol = document.createElement('ol');
Then we loop over the array using a for..of loop.
for (const item of arr) {
    const li = document.createElement('li');
    li.textContent = item;
    ol.append(li);
}
In each iteration, we create a list item (<li>) element, set it’s content to the current value from the array and insert it into the <ol> element.
Finally, we append the <ol> element (including it’s three children) to the document <body>.
document.body.append(ol);
Passing data to the console
If we want to debug your code, it’s often useful to pass data to the console. Try something like this.
const arr = ['document.createElement', 'element.textContent', 'parent.append'];
console.table(arr);
const ol = document.createElement('ol');
for (const item of arr) {
    console.log(item);
    const li = document.createElement('li');
    li.textContent = item;
    ol.append(li);
}
document.body.append(ol);
The JavaScript console is extremely powerful and has many useful features.
For simple usage, console.table is really useful for arrays and objects.
Otherwise, console.log is basically like print in python.
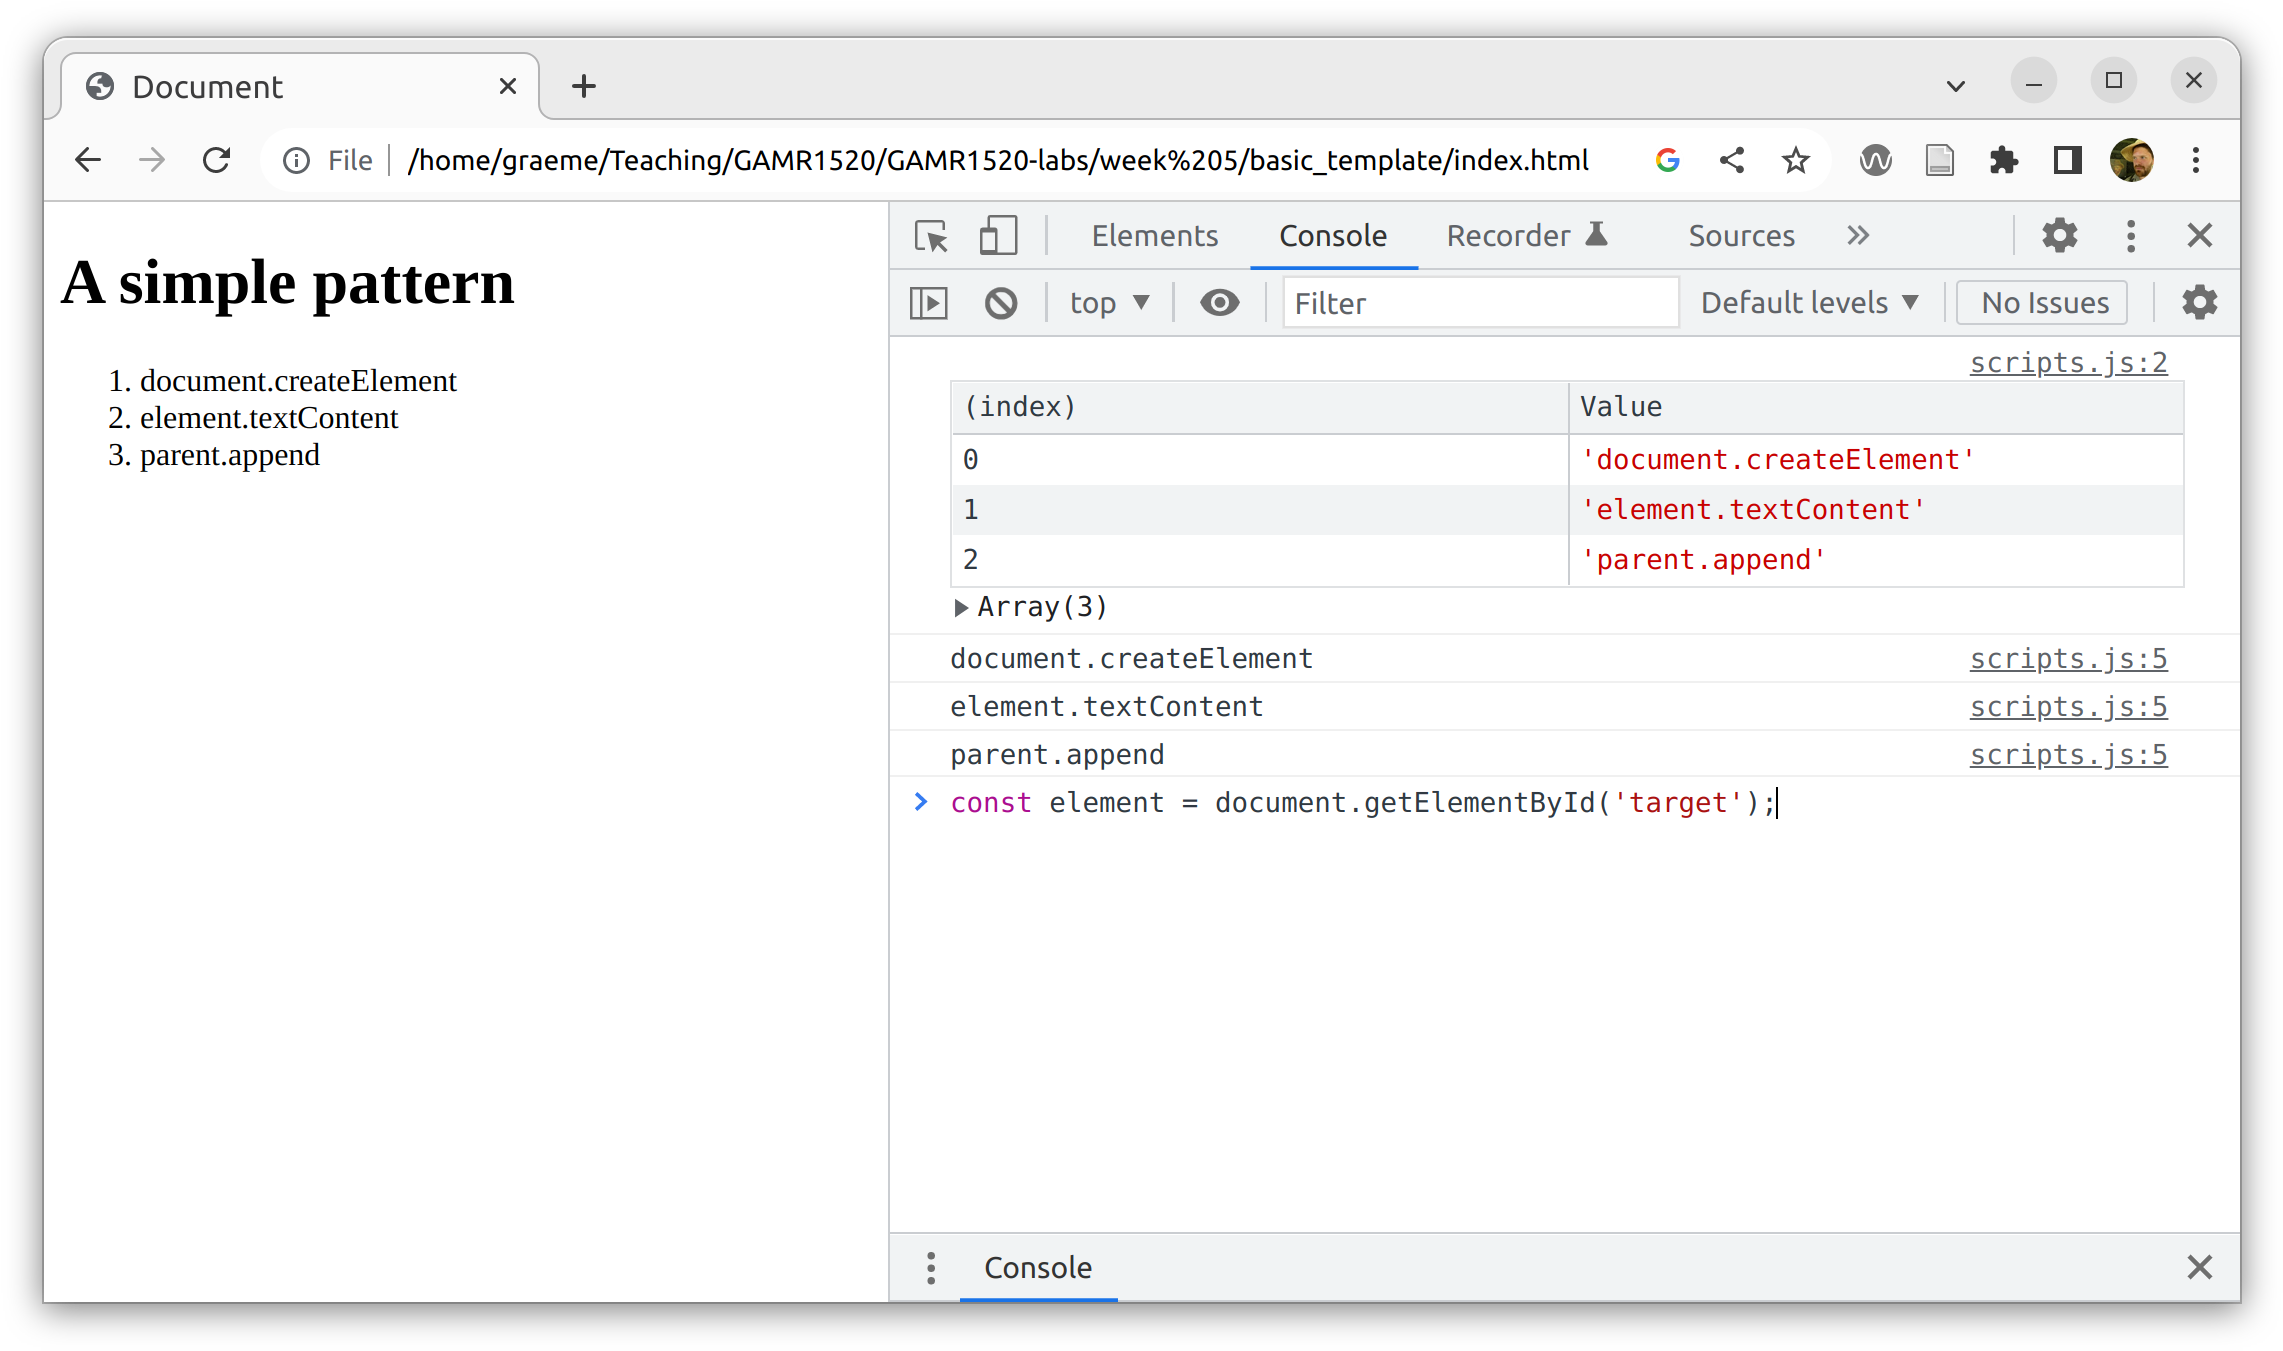
Notice how the log message includes a reference back to the file, including the line number. So you can see exactly which line logged each value.
String template literals
JavaScript has template literals very similar to python f-strings.
Rather than being identified with an f, they are identified by using backticks (`like this`) instead of single or double quotes.
Inside the template literal, JavaScript expressions can be inserted using a dollar sign and curly braces ${}.
const language = "JavaScript";
const message = `hello ${language}.`;
The backtick key is usually on the top-left of a UK or US keyboard to the left of the 1 key.
Conditional statements
Conditional statements are very similar to python, just using the JavaScript syntax of curly braces and parentheses.
const a = "something truthy";
if(a) {
    console.log(`a is ${a}`);
}
Loops
Loops can be achieved in a number of ways.
for loops
The old-style for loop is verbose but allows for a lot of flexibility. The basic syntax is as follows:
for (initialization; condition; afterthought) {
  statements
}
A concrete example is something like this:
for (let i = 0; i < 10; i++) {
    console.log(i);
}
This is often known as a traditional C-Style for loop.
The initialisation step is evaluated once before the loop begins.
In this case it declares a variable i and assigns it the value 0.
The condition provides a conditional statement that is evaluated before each iteration.
If it is true then the loop statement will execute, if not the end of the loop has been reached.
In this case, the loop will end when i is greater than or equal to 10.
The afterthought is a statement that is executed at the end of each loop.
It is generally used to modify the state if variables declared in the initialisation step.
In this case it increments the variable i.
for…of loops
The for…of loop is similar to the python for loop.
It iterates over an iterable such as an Array or a string.
Here we loop over each character in a string and log it to the console.
const data = "hello world";
for(const item of data) {
    console.log(item);
}
Just like the python for…in clause. We need to declare a variable (
itemin this case) to hold the iterated values.
Array.forEach
Another way to loop over iterables such as arrays is to call the built-in Array.forEach method with a callback function.
We will cover functions and callbacks in the next exercise.
A script of your own
Experiment with creating some JavaScript code of your own, linked into a scripts.js file. Do some silly things, write stuff into the console.
Try to use javascript to remove an element from the DOM.
This will require research - look it up on MDN.
Once you are satisfied, try the following:
const data = [
    {title: "this is a title", description: "Here is some text"},
    {title: "this is another title", description: "It can be any text"},
    {title: "a third title", description: "It doesn't really matter"},
    {title: "title four", description: "It's just for demonstration purposes"}
]
Start with the above array of objects. Write a script that loops over the array, creating an
<article>element for each object.Within each
<article>element, append an<h2>element with thetitleproperty as content and a<p>element with the description as content. Append each<article>into the document body.You should end up with something like this:
<body>
    <article>
        <h2>this is a title<h2>
        <p>Here is some text"</p>
    </article>
    <article>
        <h2>this is another title<h2>
        <p>It can be any text"</p>
    </article>
    <article>
        <h2>a third title<h2>
        <p>It doesn't really matter"</p>
    </article>
    <article>
        <h2>title four<h2>
        <p>It's just for demonstration purposes</p>
    </article>
</body>
Again, try to cause errors and understand what the error means. We haven’t covered everything, so you (or someone nearby) will have to work out how to do it.
Trying and getting it wrong is only the first step in the process. It’s extremely important that you identify the problems with your approach and solve them through research. This is what coding is all about.
If anything strange happens, ask someone (this is research). Your lab tutor can help (asking them is also research). If you get completely stuck, bring your question to the next lecture (research, obvs).
Remember, we are all learning together and we may not know the precise answer but we can certainly help you to research the answer.
